
Blog · Marketplaces · 5-min read
Sharetribe 101: How to Create a Custom Marketplace App in 2026

Welcome to our ultimate guide to creating a marketplace website using Sharetribe's no-code builder.
In this post, we'll cover the basics of Sharetribe marketplaces, the steps to building one, and how much your project will cost.
Let's get started.
Sharetribe is a no-code marketplace app and website builder designed for non-technical startup founders as well as seasoned product developers. It features a clean, organized, and user-friendly visual interface with a robust developer environment for advanced users.
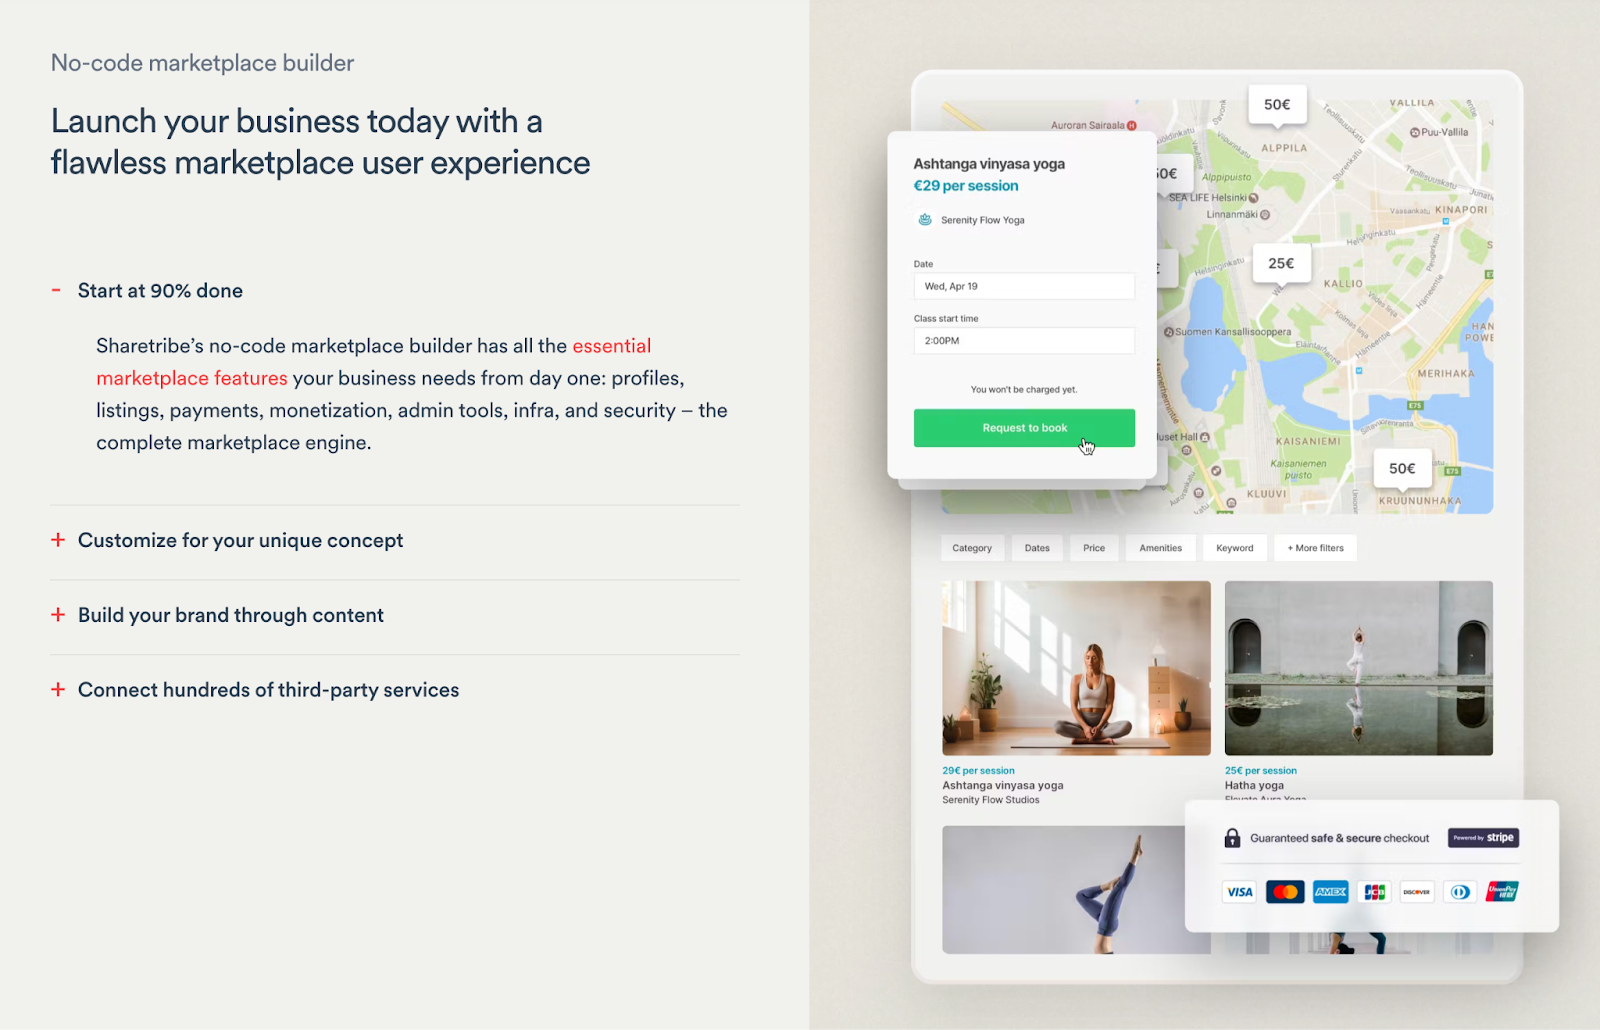
An online marketplace facilitates transactions between sellers of goods and services with buyers via a virtual storefront. While it's typically used in an ecommerce context, there are other types of marketplaces outfitted for specific niches.
To give you a better idea of how marketplaces work, here are some of the marketplace types that Sharetribe can help you create:
Defining your concept is the first step to building a successful marketplace with Sharetribe.
Next, it's time to fire up the Sharetribe Console.
Here are the steps on how to build a custom marketplace app with Sharetribe:
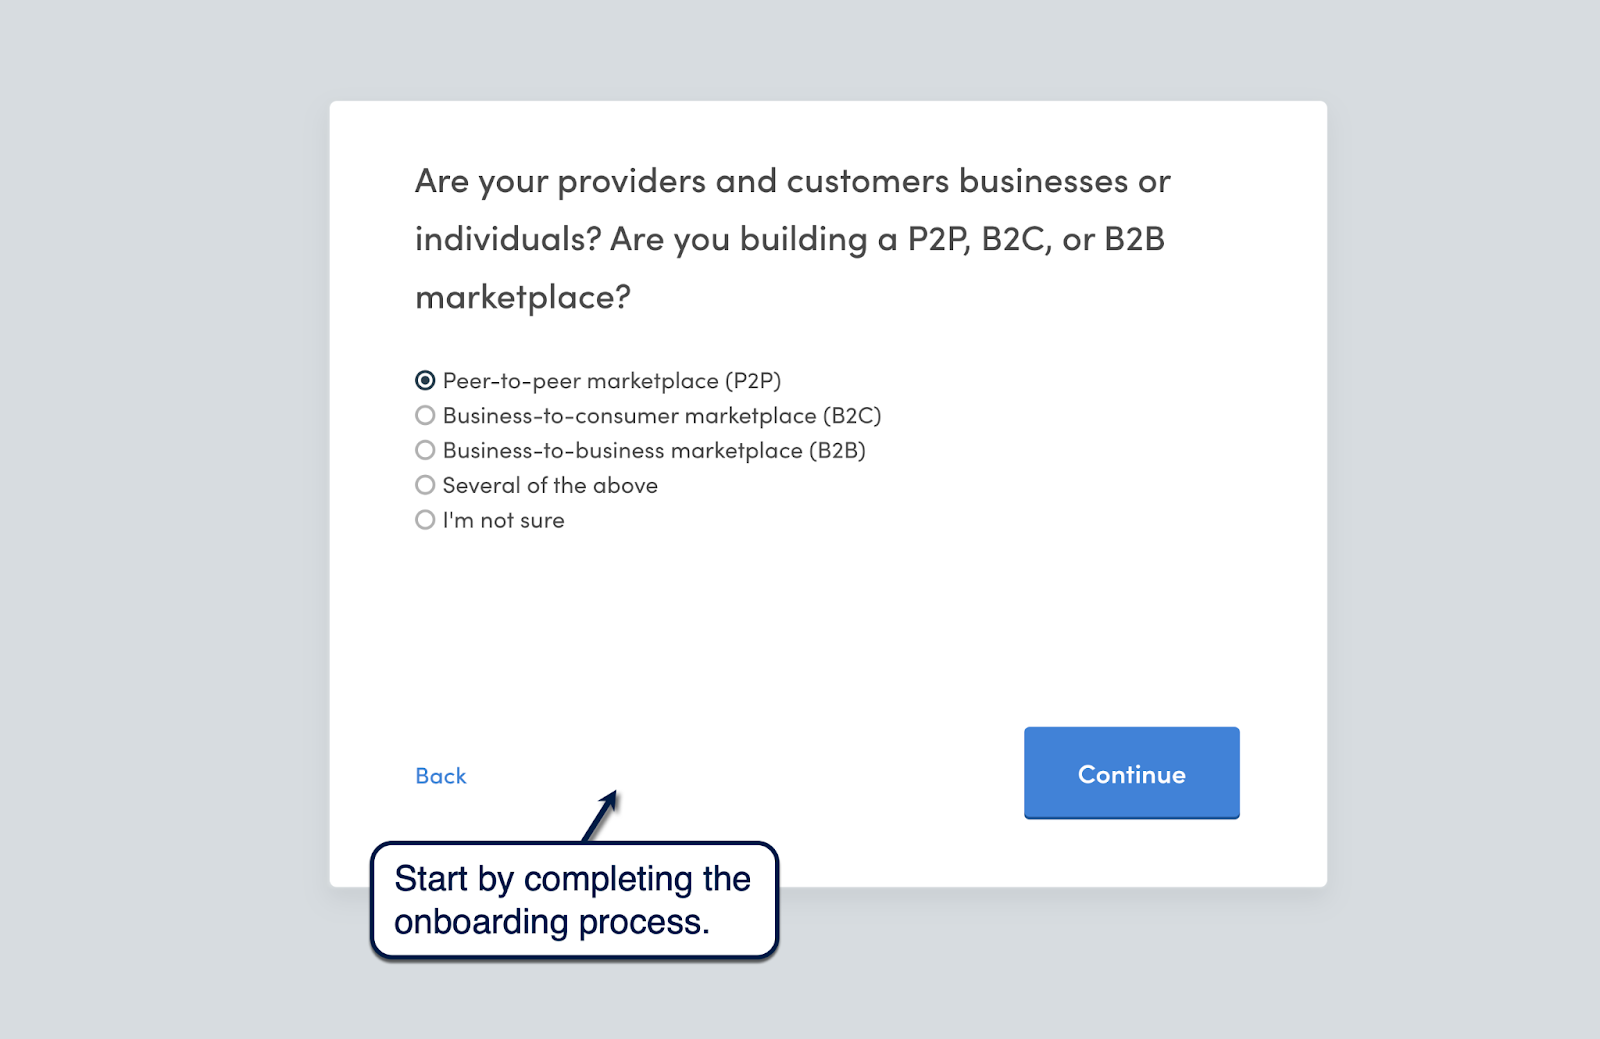
Sharetribe kicks off with an onboarding process that tailors the console to your needs.
Simply answer the questions as accurately as you can to proceed.
The onboarding process continues to the Sharetribe Console. This is where you can build and manage everything in your marketplace, from your domain name to your third-party integrations.
Take note that, at this point, you already have a functional marketplace app that you can test by creating an account, posting your first listing, and initiating a mock transaction.
Feel free to test how your marketplace performs right out of the bat.
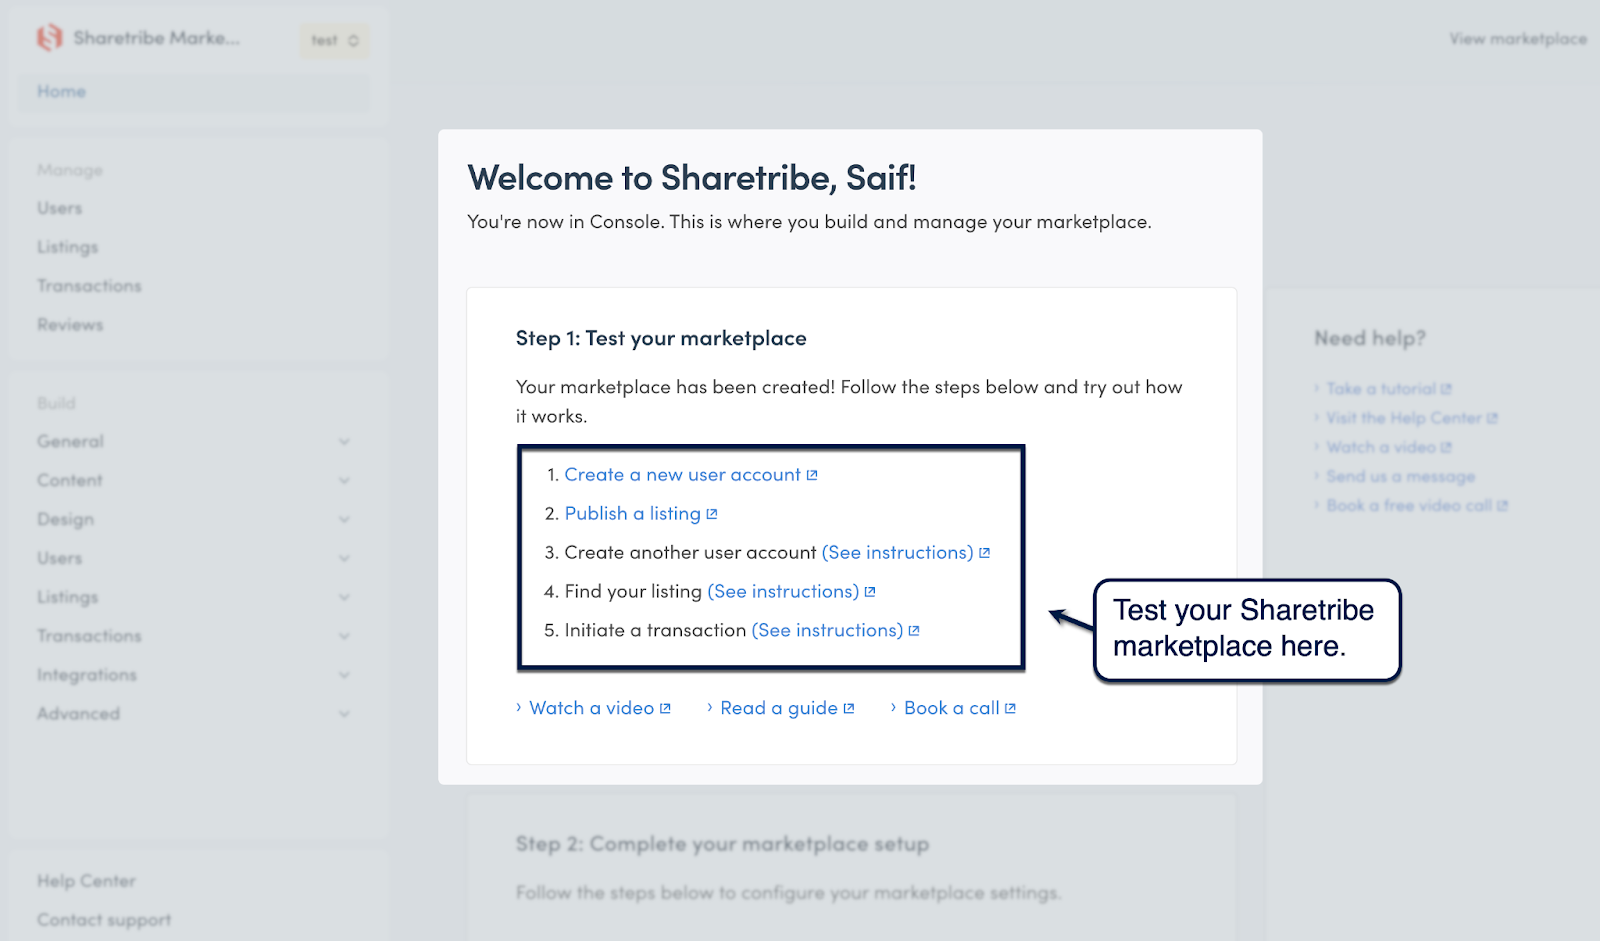
We recommend checking out Sharetribe's beginner learning resources in the help section to the right. It's also a good idea to explore the Sharetribe Console at your own pace using the navigation section on the left.
Once your Sharetribe marketplace is prepped up and ready, go to 'General' under the "Build" section. This is where you can modify basic settings, like your marketplace's name, domain, email address, language, and currency.
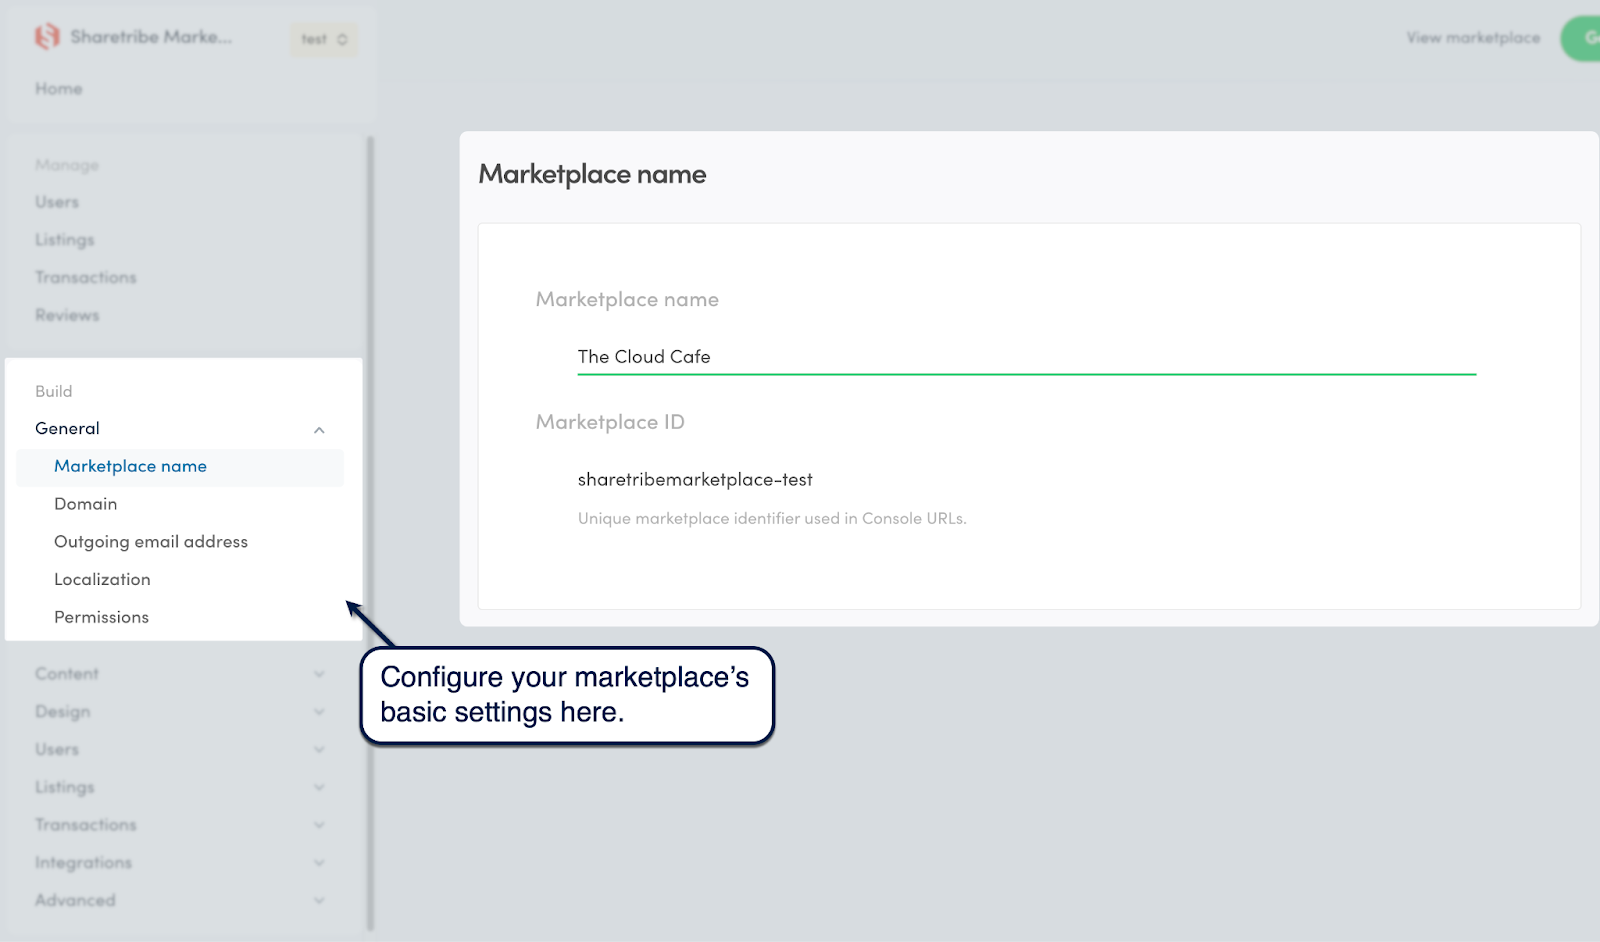
Of course, you don't need to change anything right now, especially if you completed the onboarding process earlier.
For more basic customization options, go to 'Design' and click 'Branding.'
Here, you can specify your marketplace's primary colors, logos, login background image, and other options.
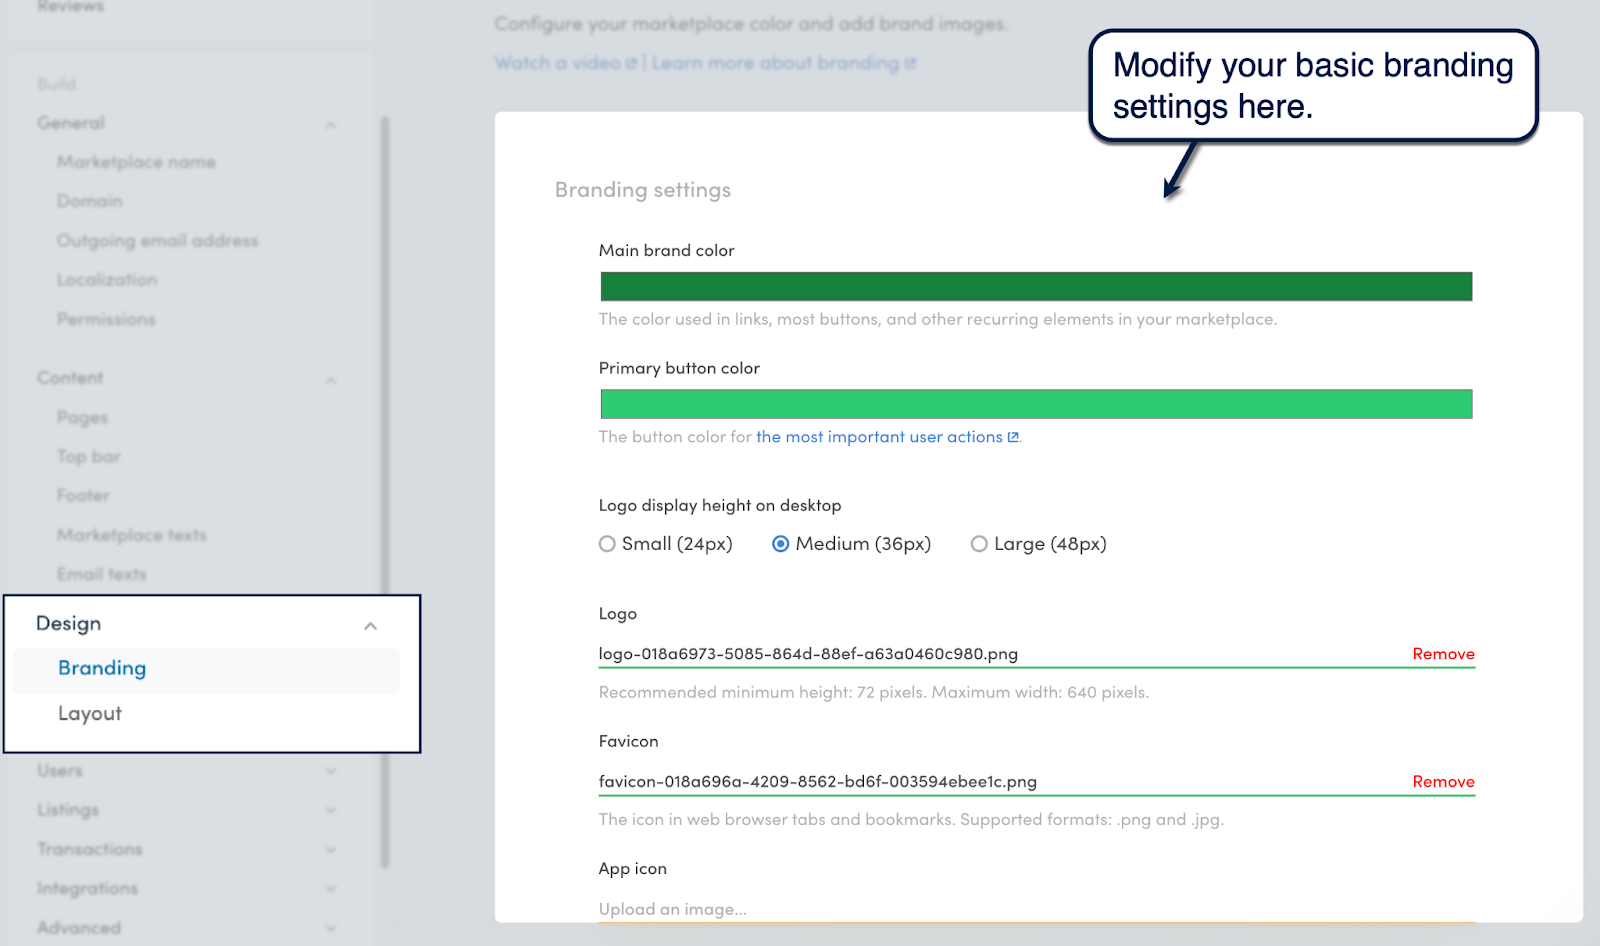
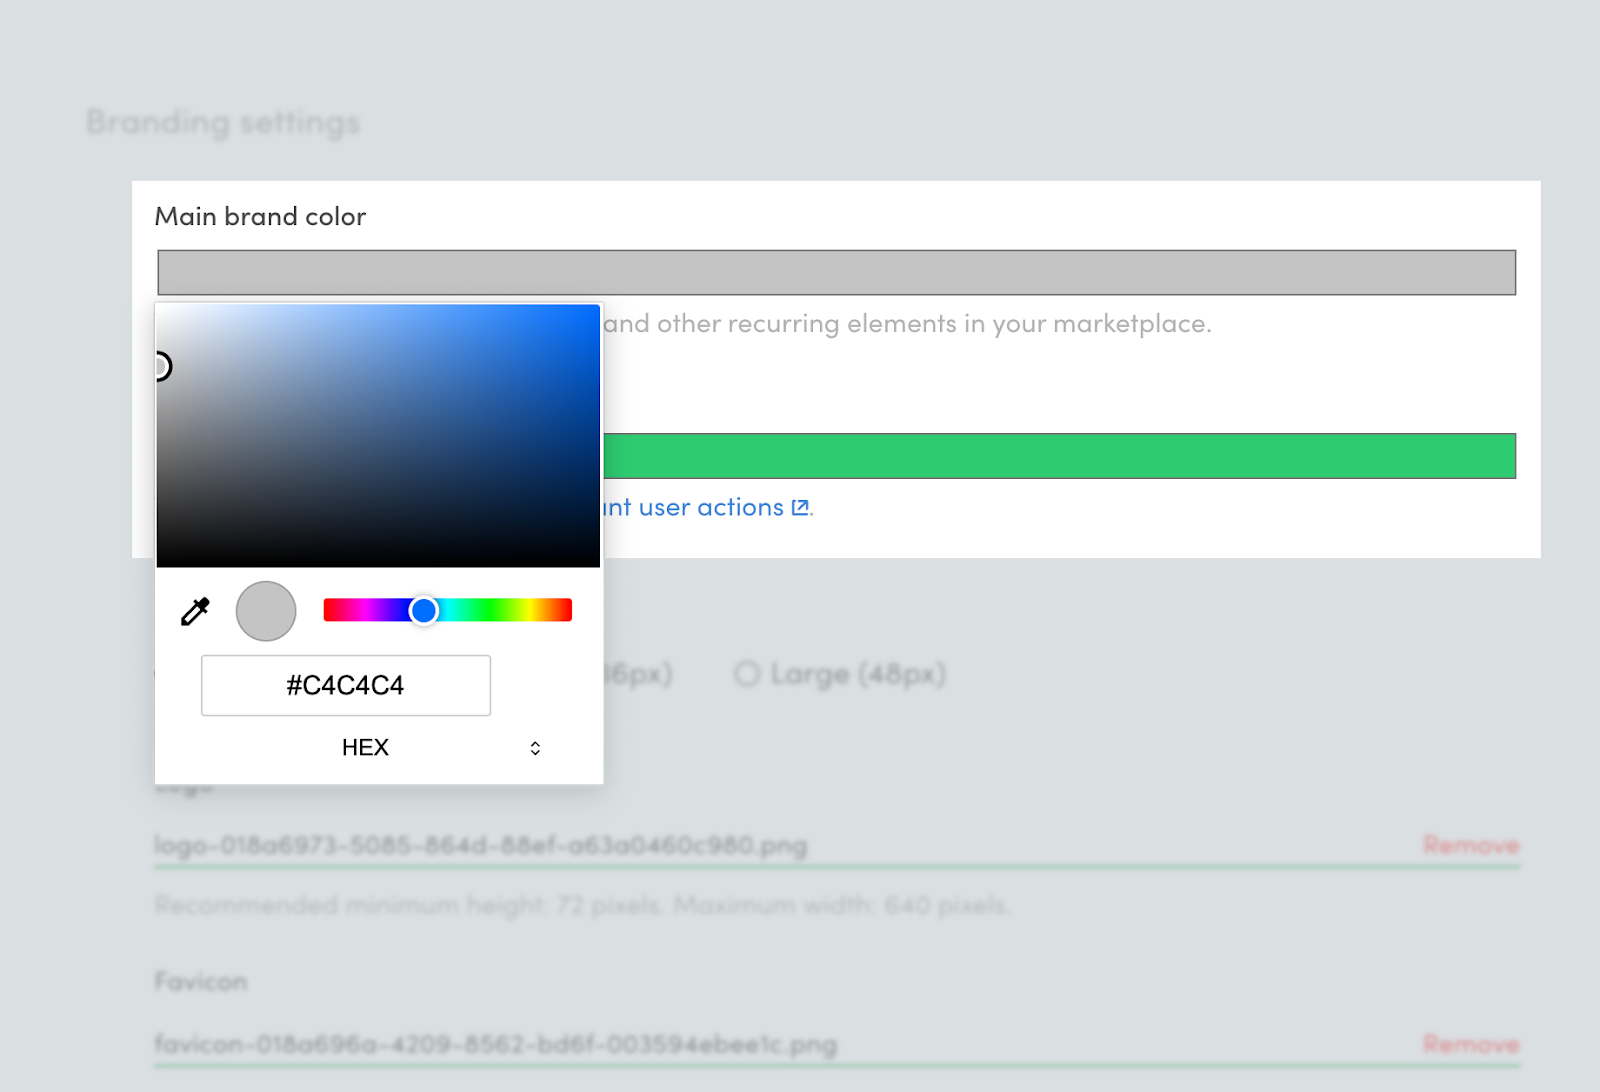
For colors, Sharetribe features an RGB or HSL color picker. Alternatively, you can manually input the hex code of the color you want to use.
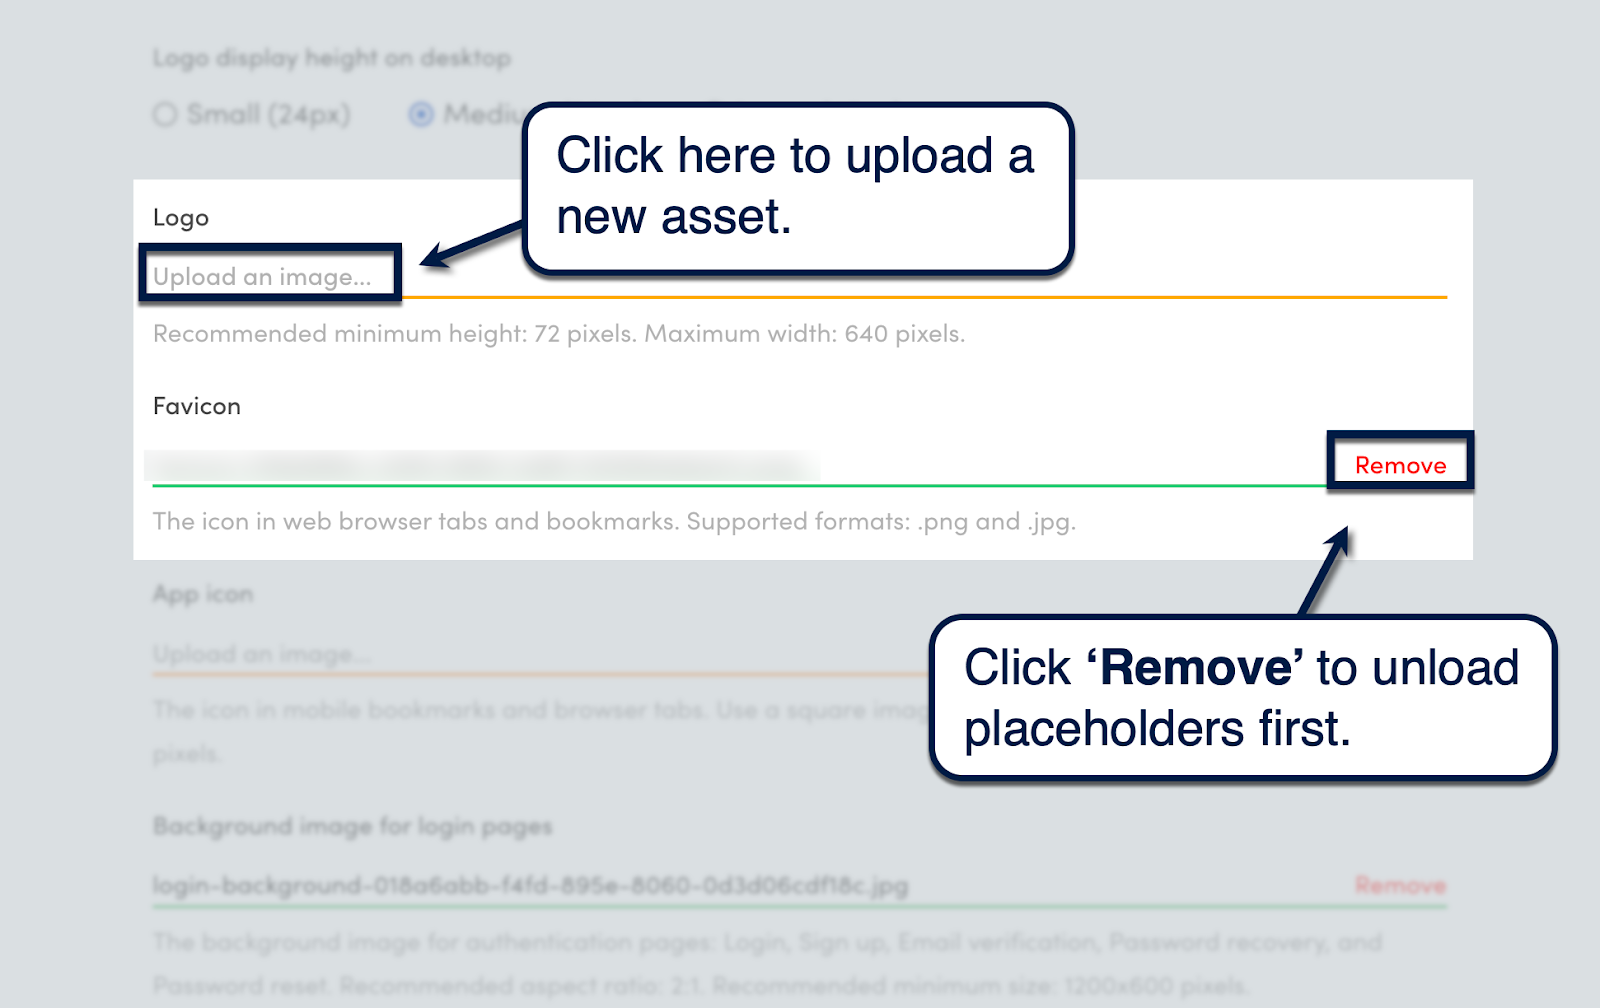
For logos and other images, click 'Remove' to unload the default placeholder assets first. Next, click 'Upload an image' to replace the asset with any file from your device.
Click 'Save changes' to apply your new colors and images to your test marketplace.
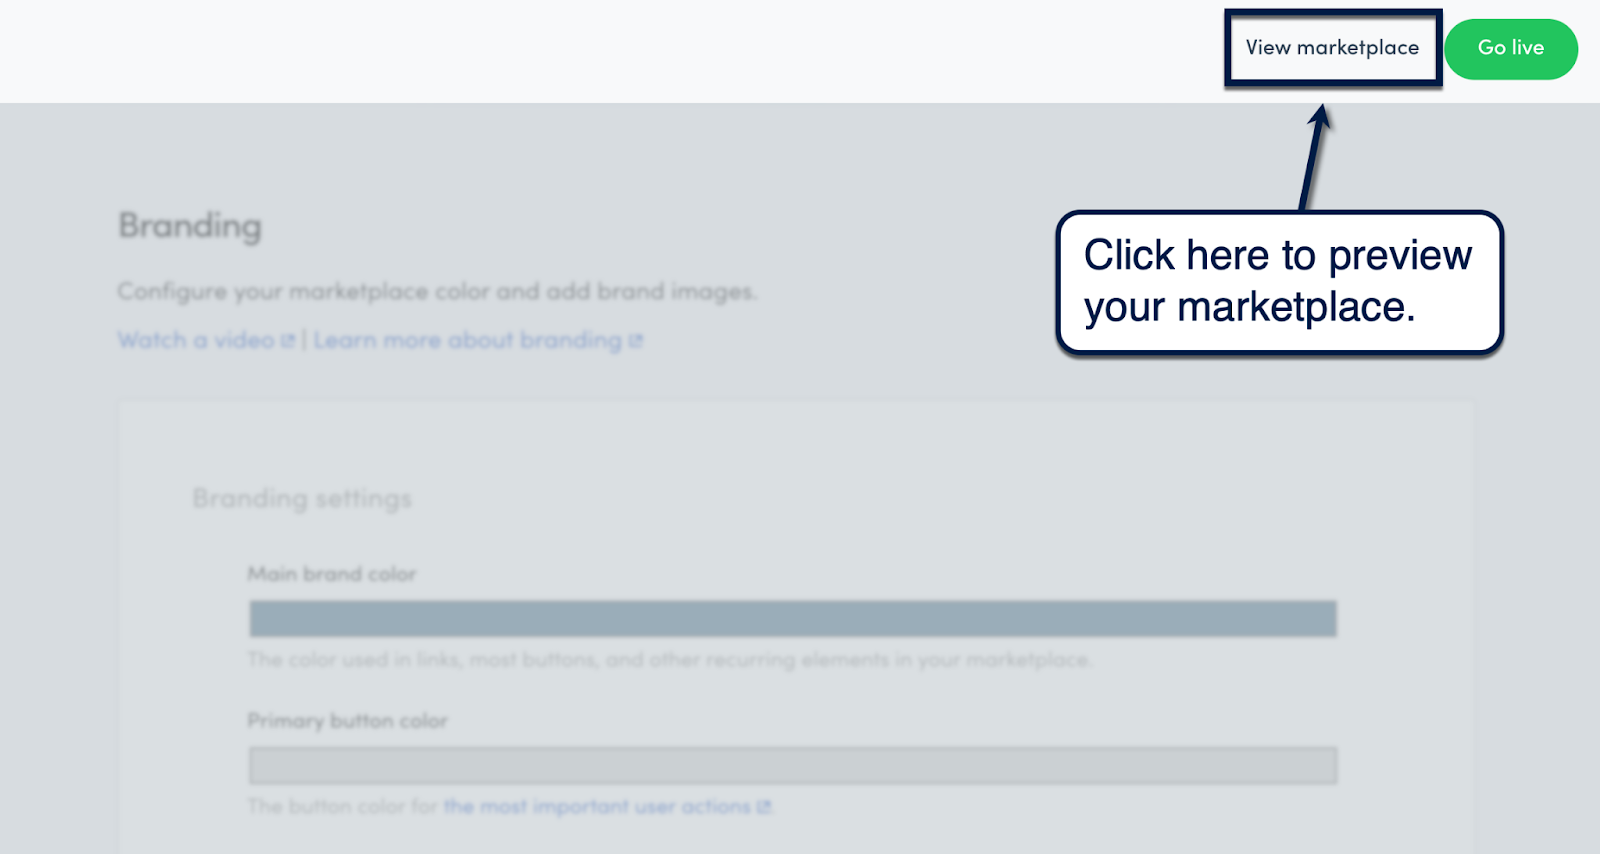
Don't forget to preview your marketplace to see if the results match your vision.
Testing changes as you apply them makes it easy to troubleshoot mistakes. Be sure to preview often by clicking 'View marketplace' in the top-right corner.
Layout settings affect the way your search and listing pages are presented to your potential customers.
To configure your layouts, go to 'Layout' under the 'Design' submenu.
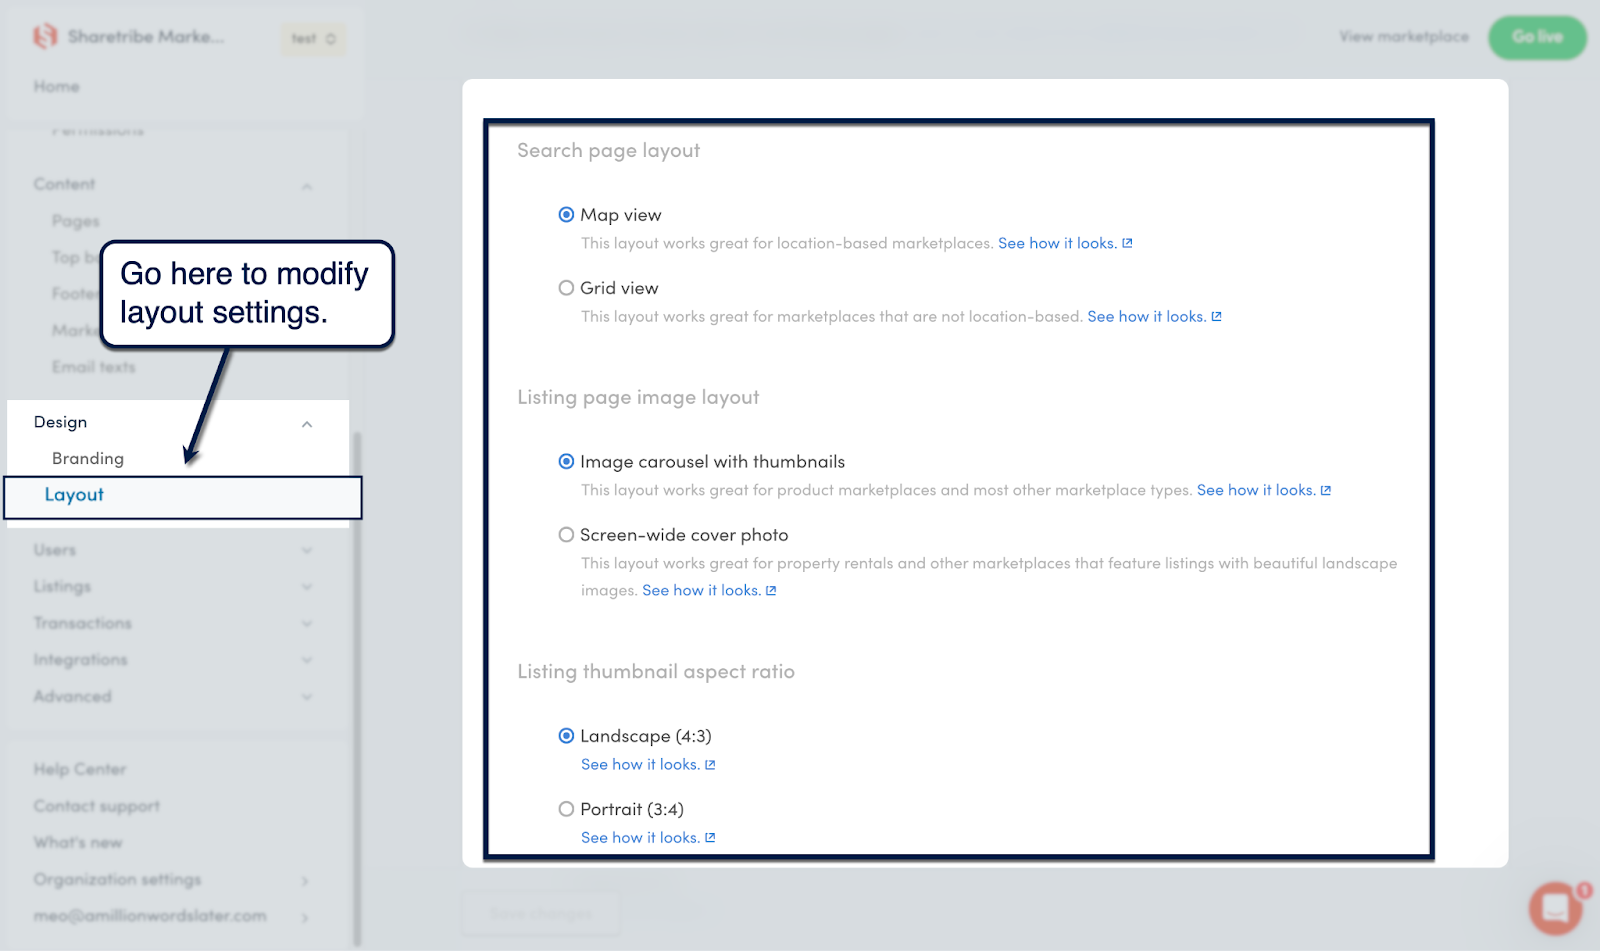
Here's a quick rundown of the layout options you can use:
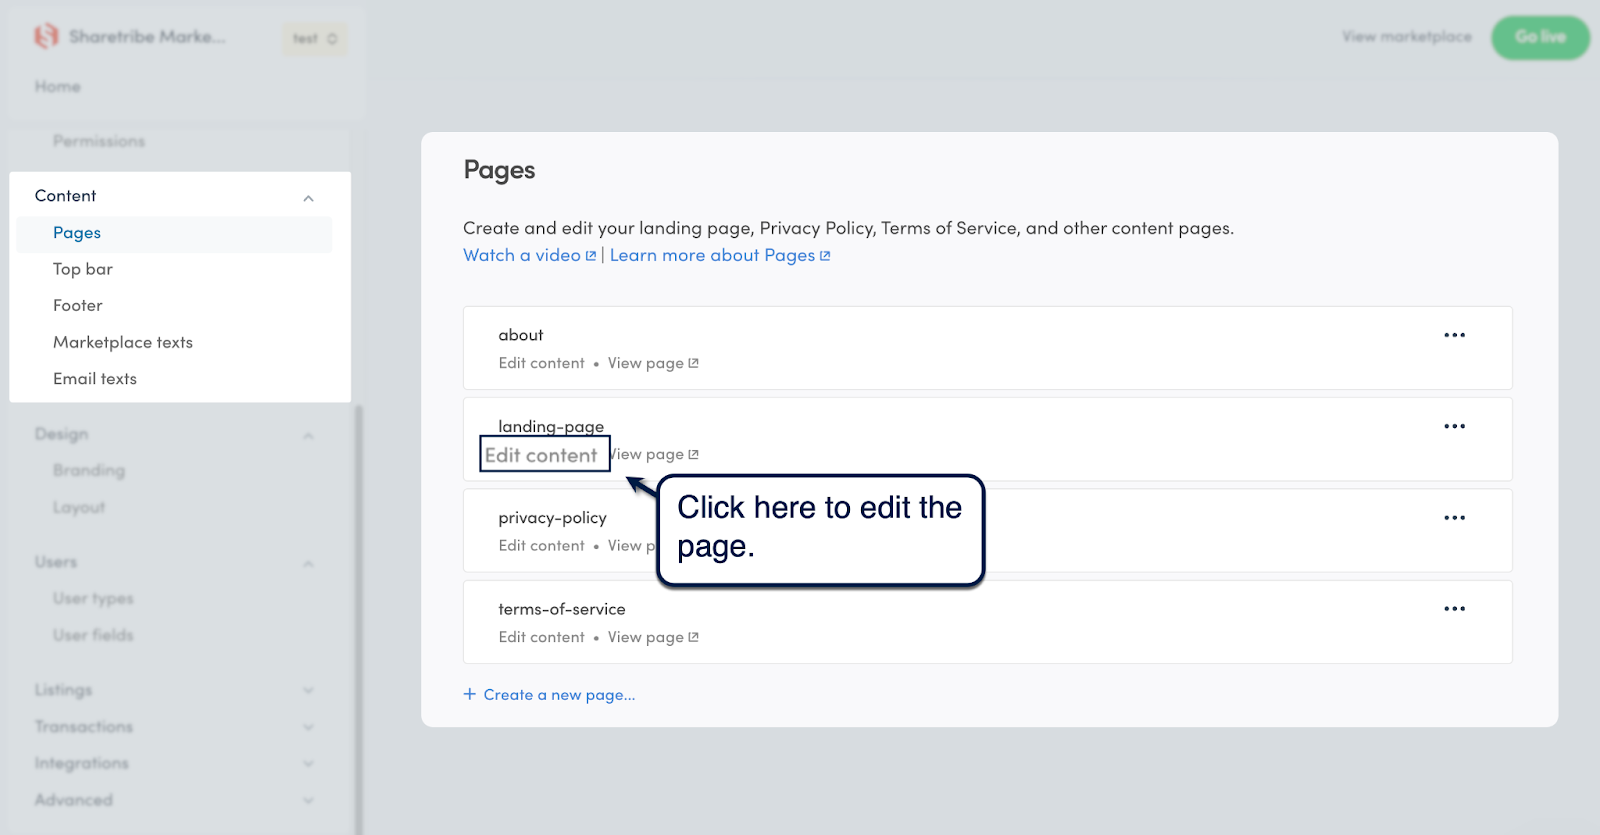
Sharetribe automatically creates four default pages for all marketplaces, namely your "About," privacy policy, terms of service, and main landing pages.
To edit these pages, go to 'Content' from the main menu and click 'Pages.' Look for the page you want to edit and click 'Edit content.'
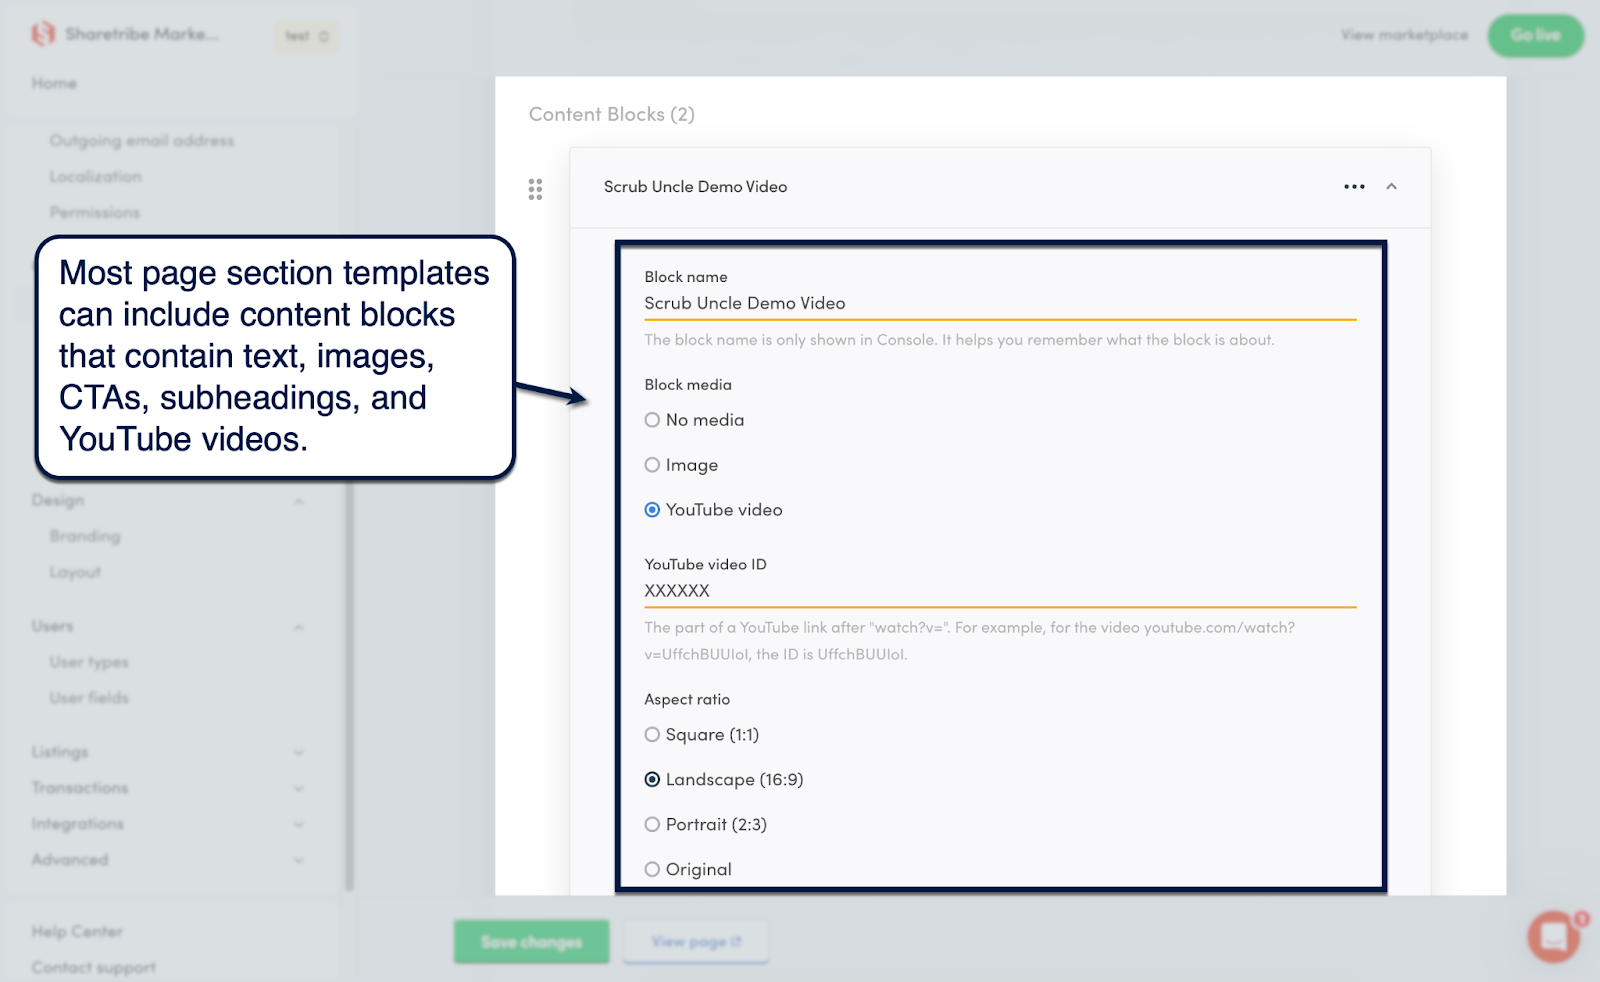
Sharetribe's page editor allows you to add, rearrange, and customize pre-defined page section templates, namely:
With the exception of the hero section, Sharetribe's section templates can contain additional "content blocks" that can be stacked according to the specified layout. These blocks contain elements like text, images, YouTube video embeds, subheadings, and CTA links.
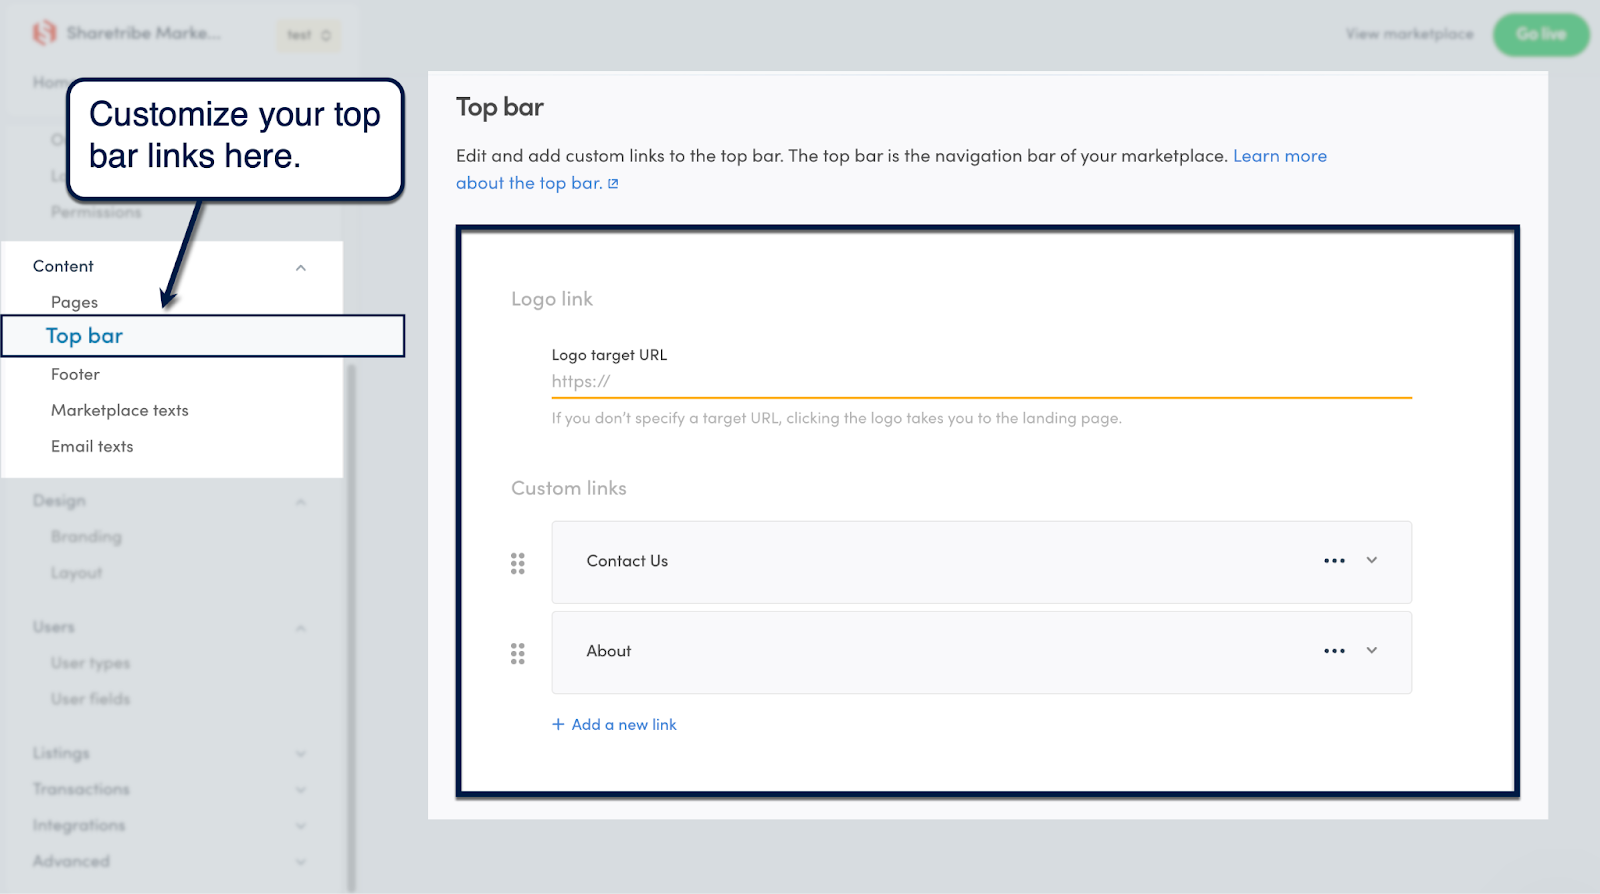
Apart from the main content sections, the other two key areas you should customize on your Sharetribe marketplace are the top bar and footer details.
You can edit both through the 'Content' submenu. For your top bar, you can modify your logo link URL as well as additional internal and external links.
When it comes to your footer, you'll have more flexibility to add more meaningful elements, namely, your marketplace's slogan, social media links, and custom content blocks.
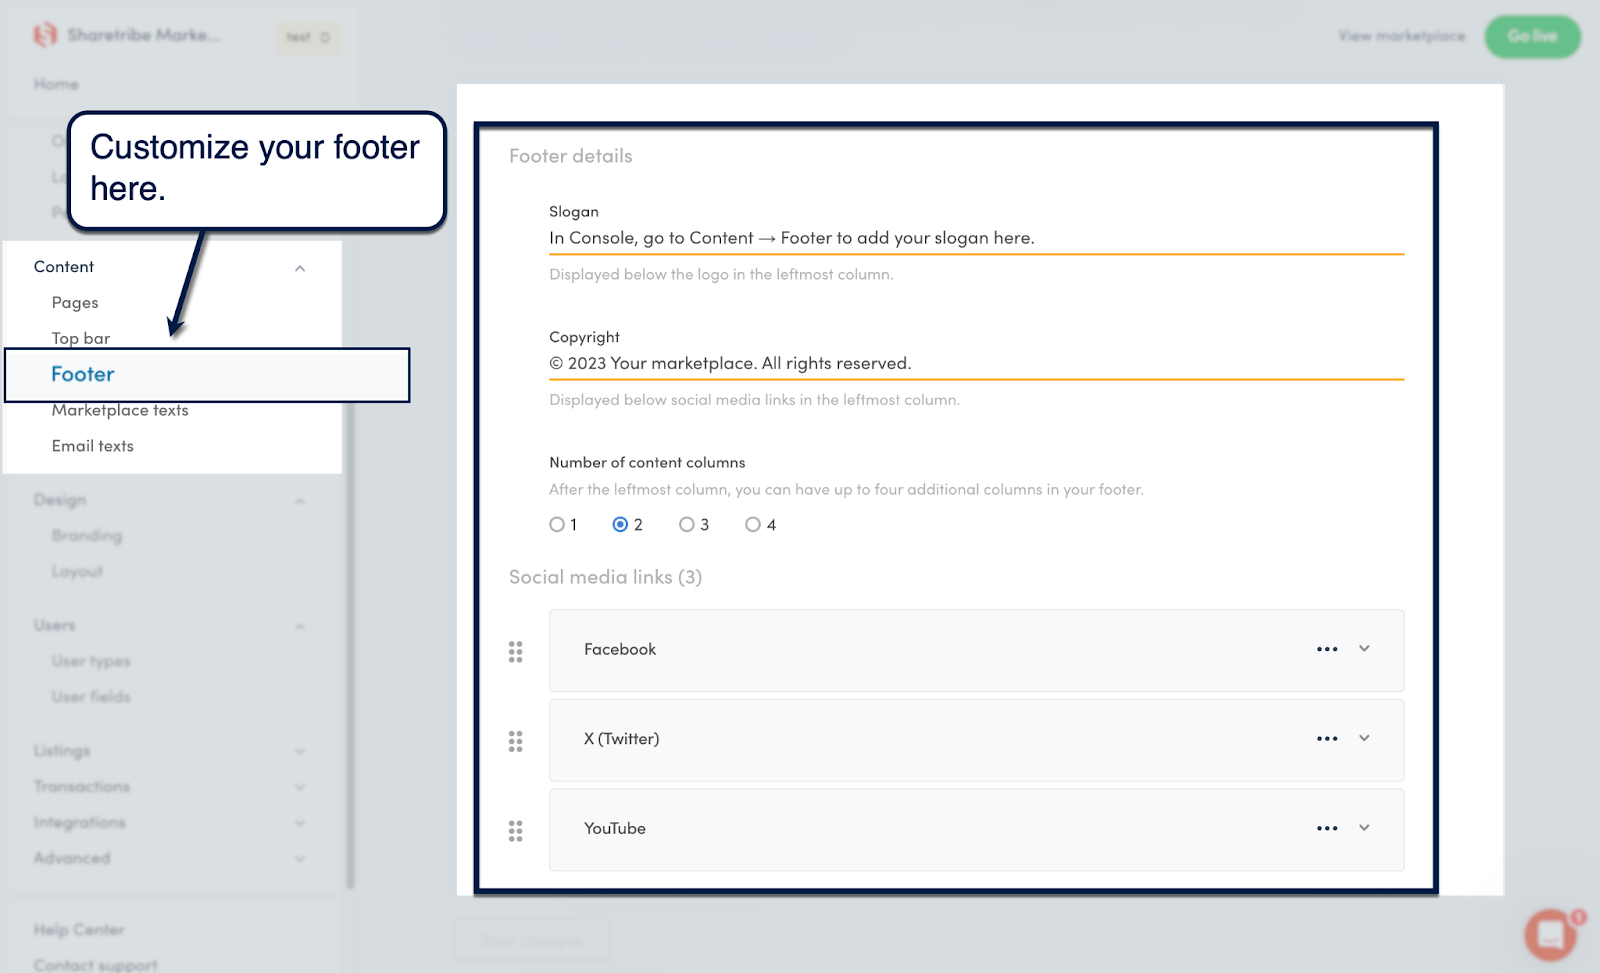
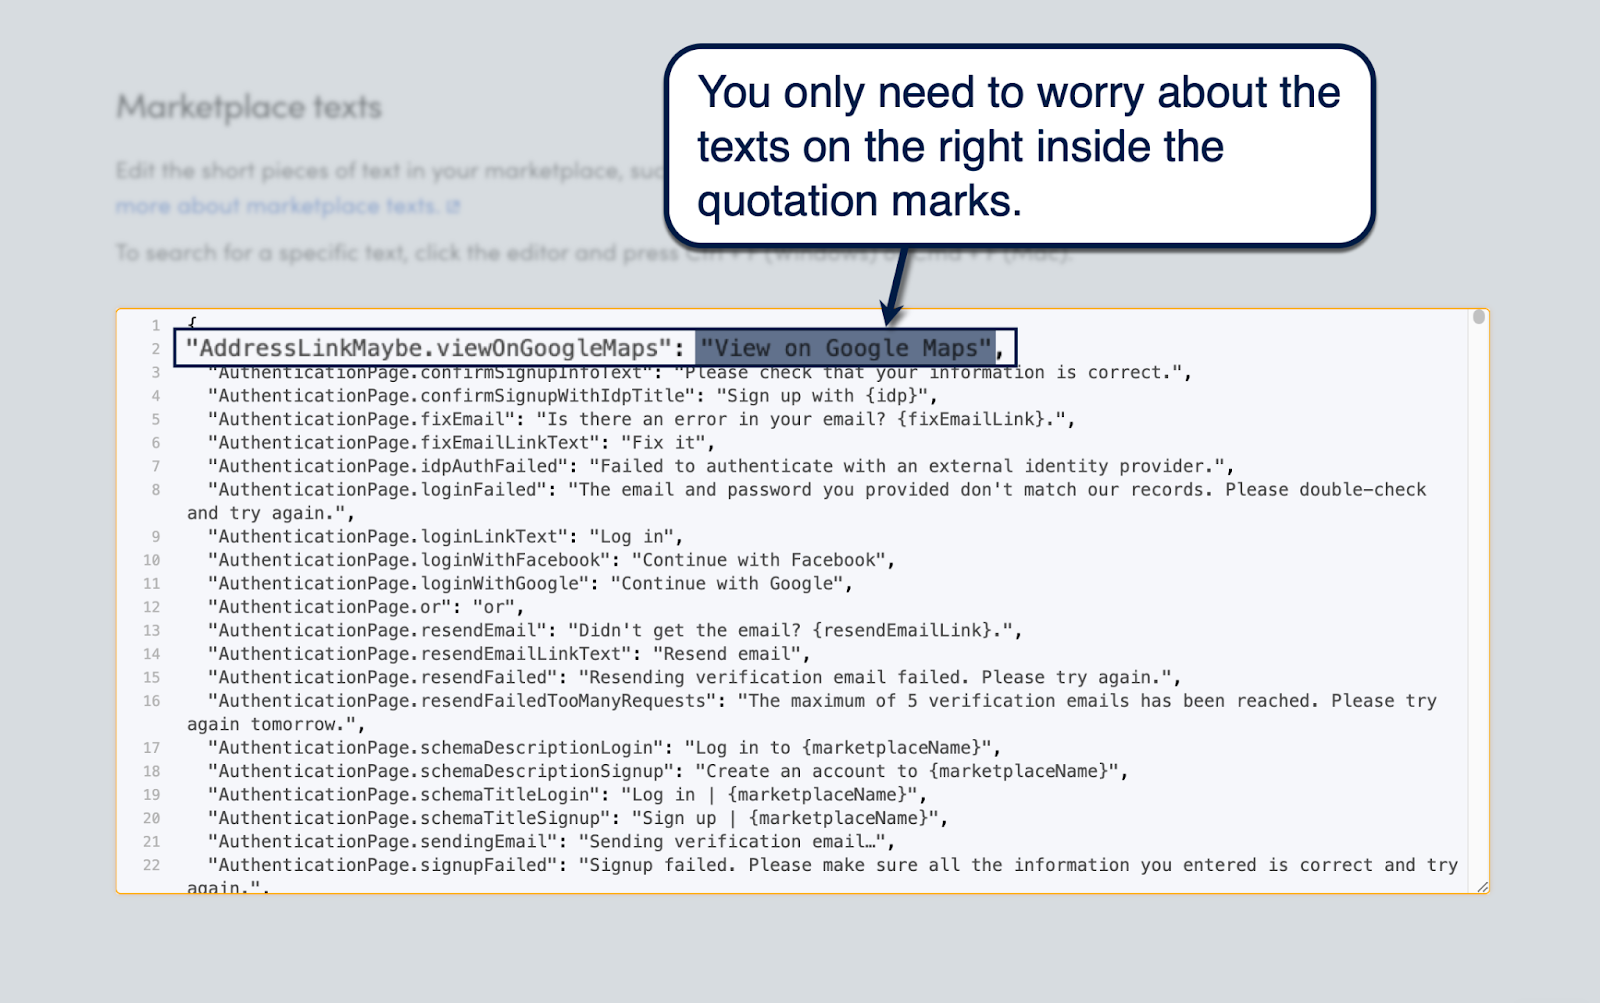
The remaining sections in the "Content" submenu are 'Marketplace texts' and 'Email texts.'
Both may seem intimidating to non-technical users since they use a code editor. Just remember that you only need to modify the texts on the right encased in quotation marks.
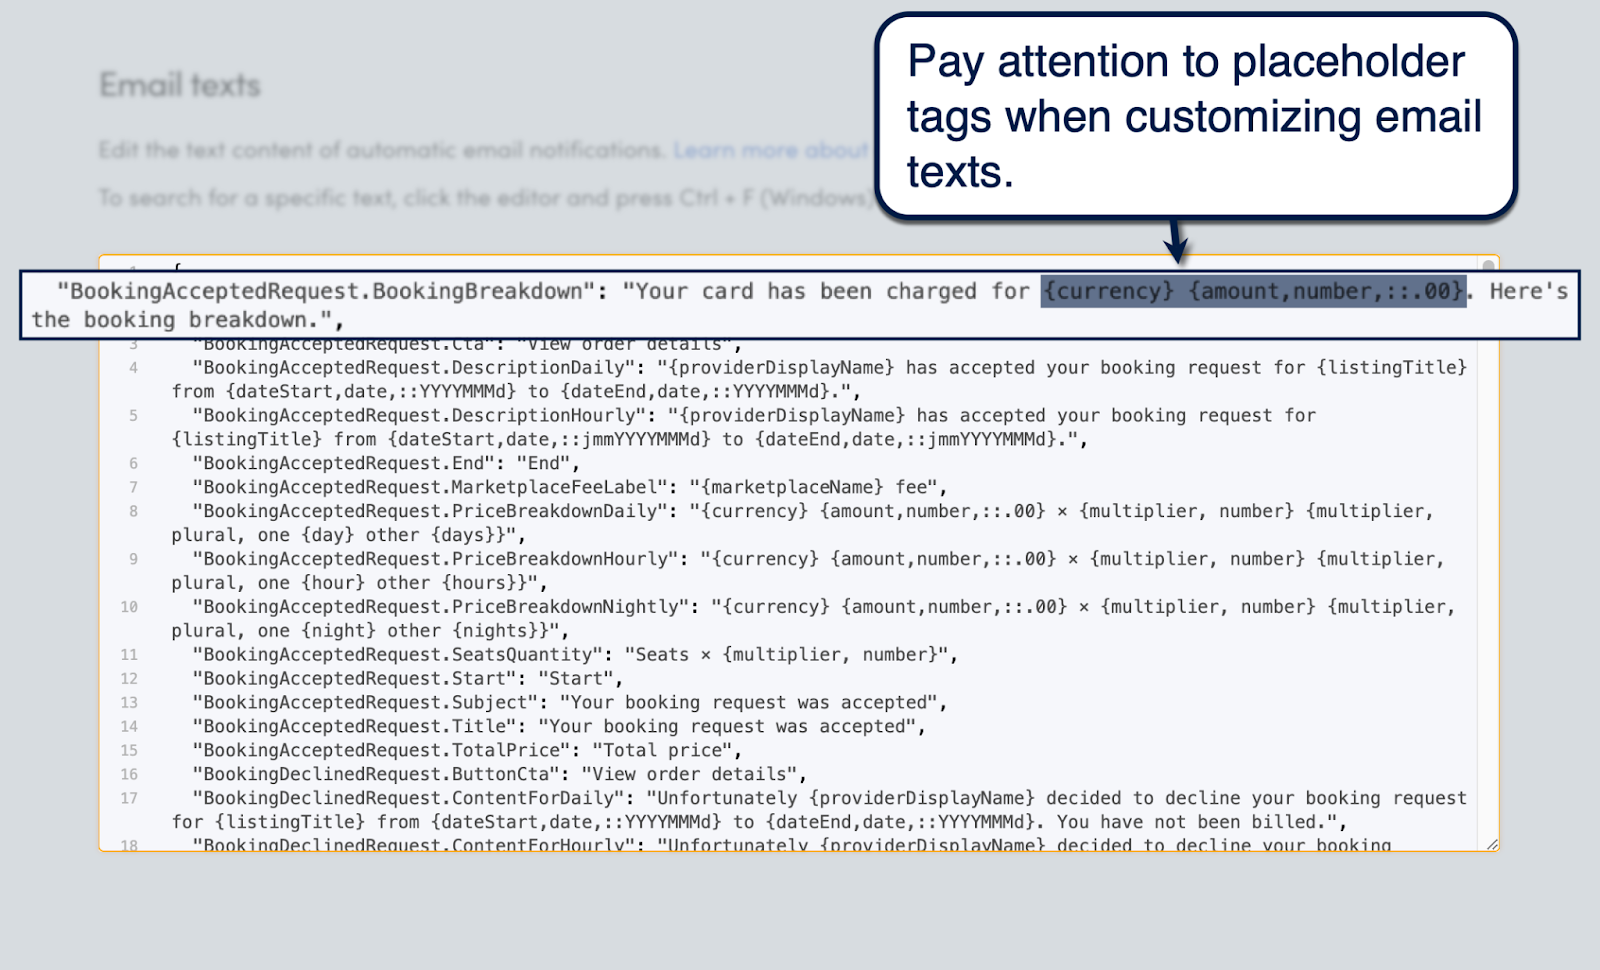
The same process is done when customizing the copy in your automated email notifications. Only this time, you also need to play around with placeholder tags like '{currency},' '{providerDisplayName},' and '{marketplaceName}.'
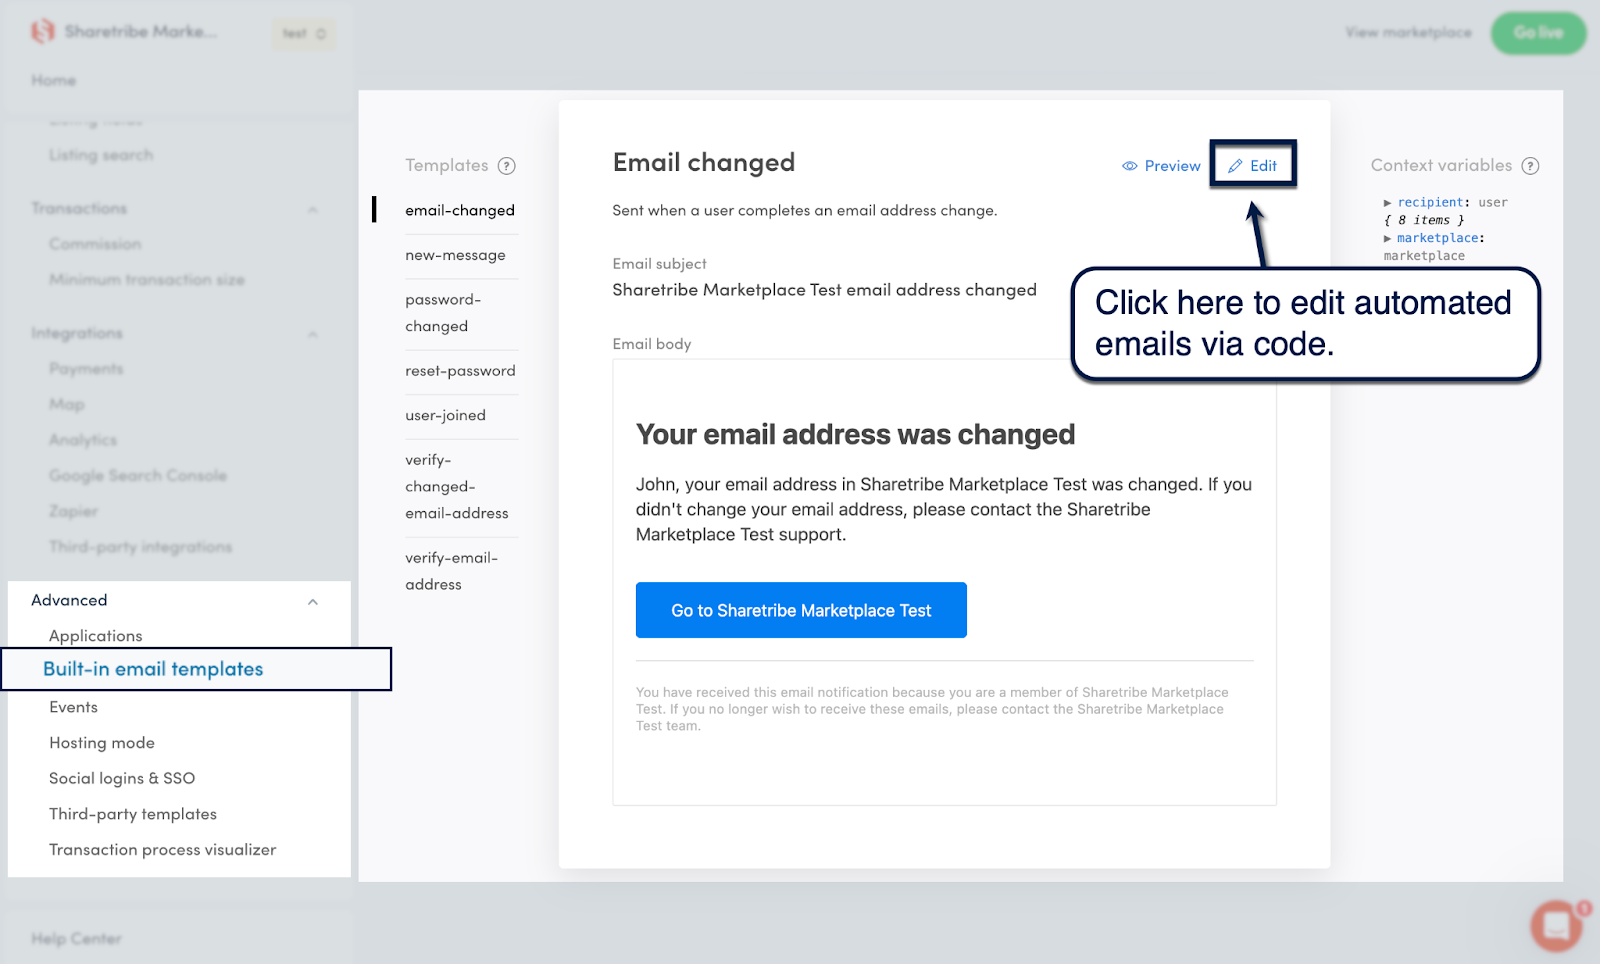
If you want to change the overall look of your emails, go to 'Advanced' and select 'Built-in email templates.' Here, you'll be able to customize the appearance of automated emails using code.
After carving out your marketplace's frontend, it's time to step into more technical territory.
The mechanics of your marketplace boils down to three things: users, listings, and transactions.
For users, it's all about personalizing the experiences of those who sell or provide the goods along with those who pay for them. You can specify the required information fields for each user type, modify their display name settings, or create a new user type from scratch.
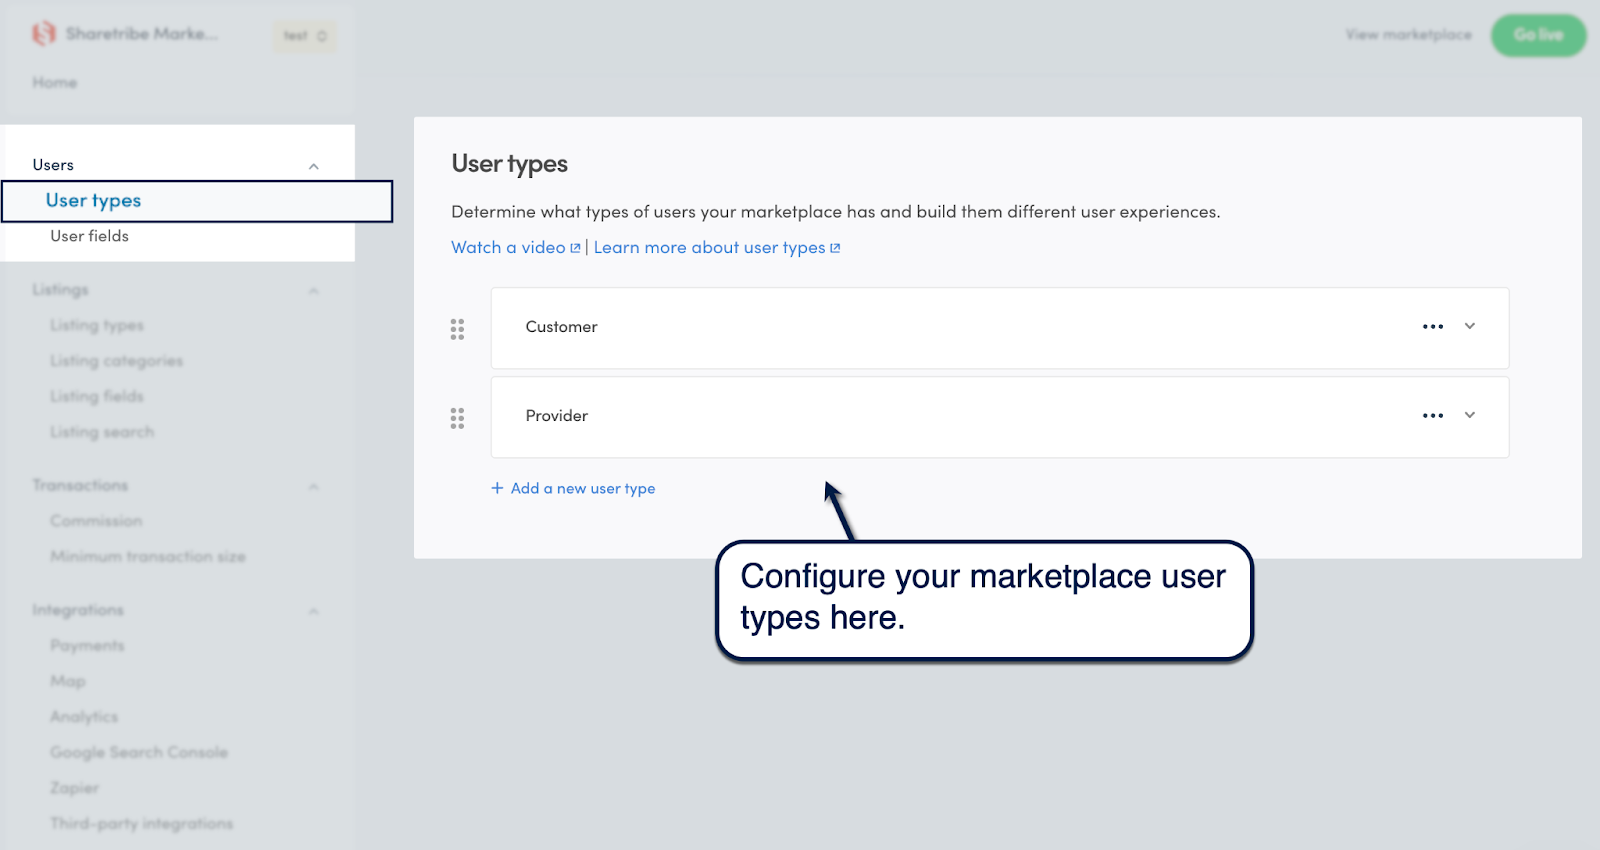
Next comes the listings, which are the lifeblood of your marketplace website or app.
On Sharetribe, marketplace listings fall under three categories:
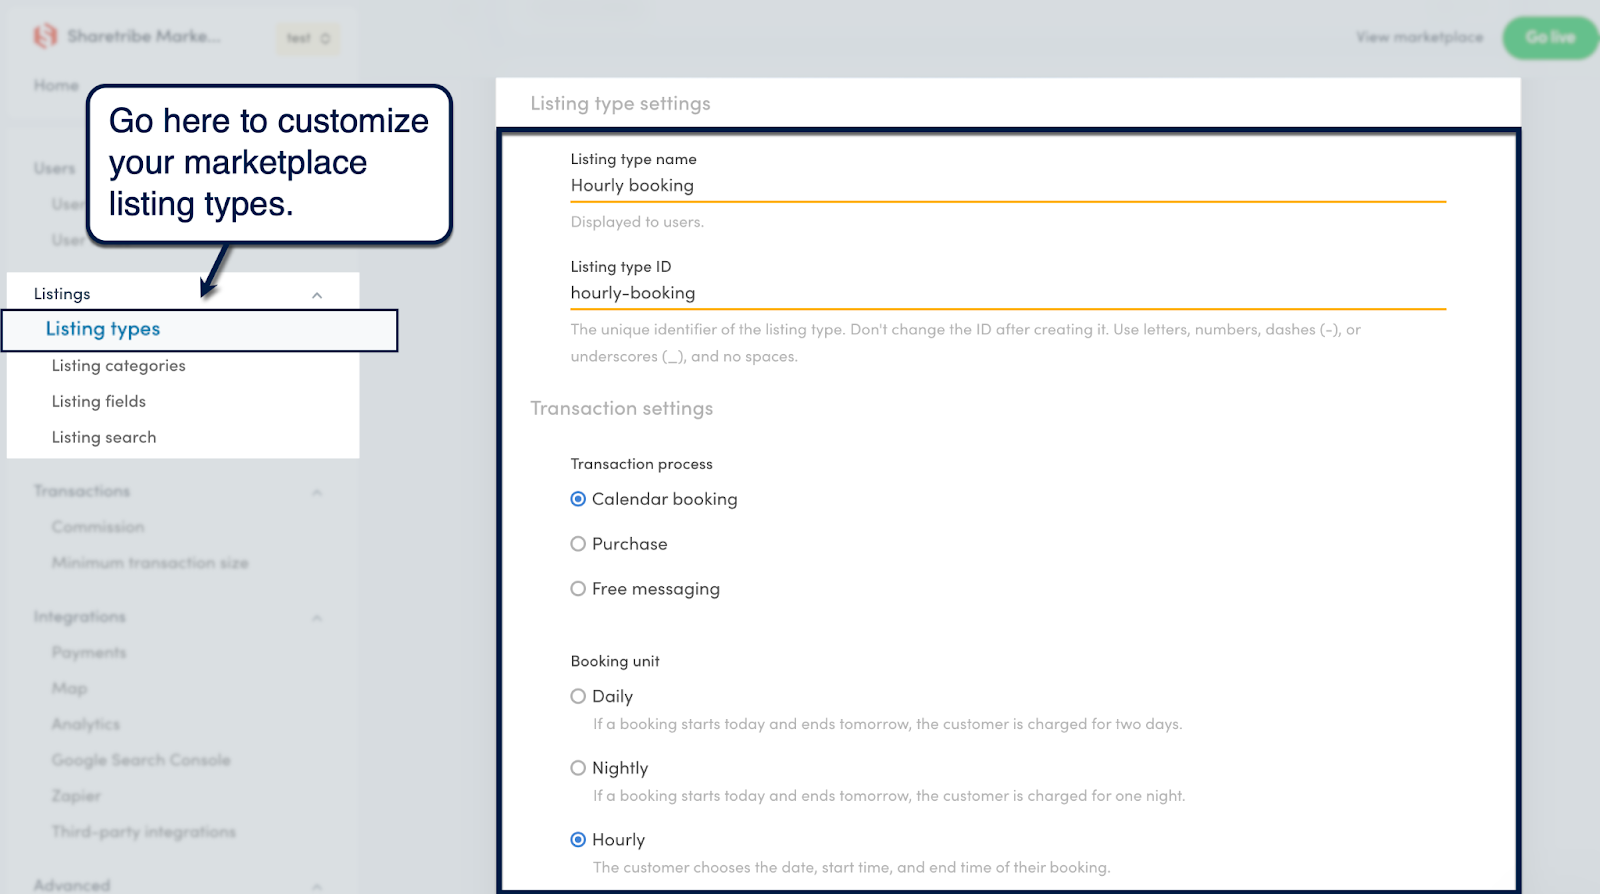
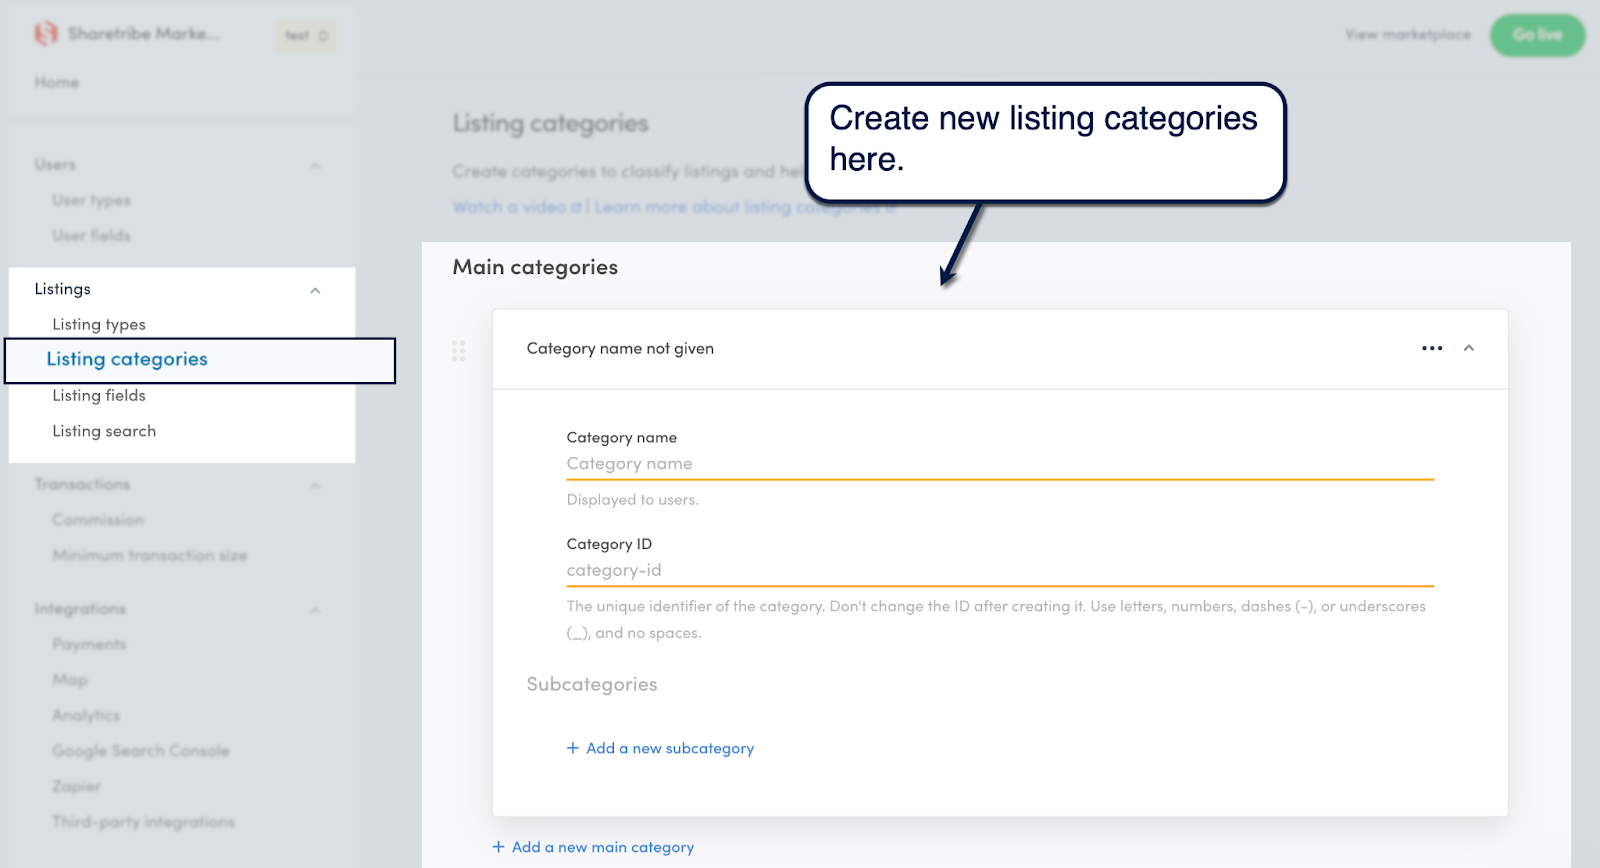
After setting up your listing types, create listing categories to help customers find the right listings in your marketplace.
Start by defining main categories, which can branch out to multiple subcategories. Just go to 'Listings,' select 'Listing categories,' and click 'Add a new main category' to create listing categories.
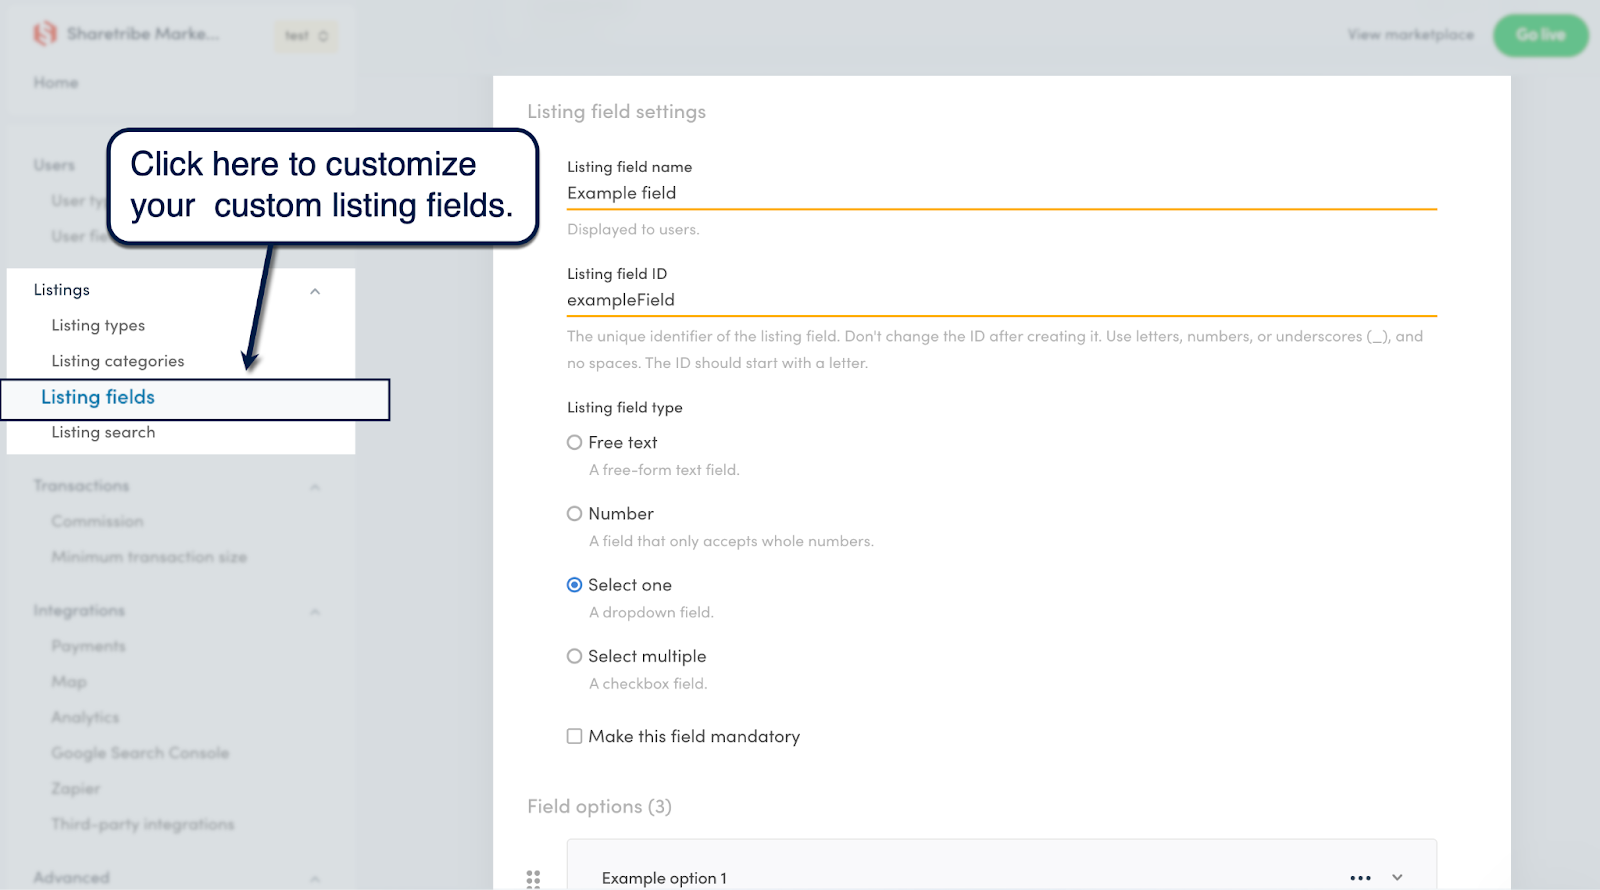
Next up, creating custom listing fields lets you require additional information from your sellers. At the same time, custom fields can be used as search parameters that help customers find relevant listings from your marketplace.
Listing fields can be a plain text entry field, number, checklist, or drop-down menu. You can make fields mandatory, define field options, or limit fields to certain listing categories.
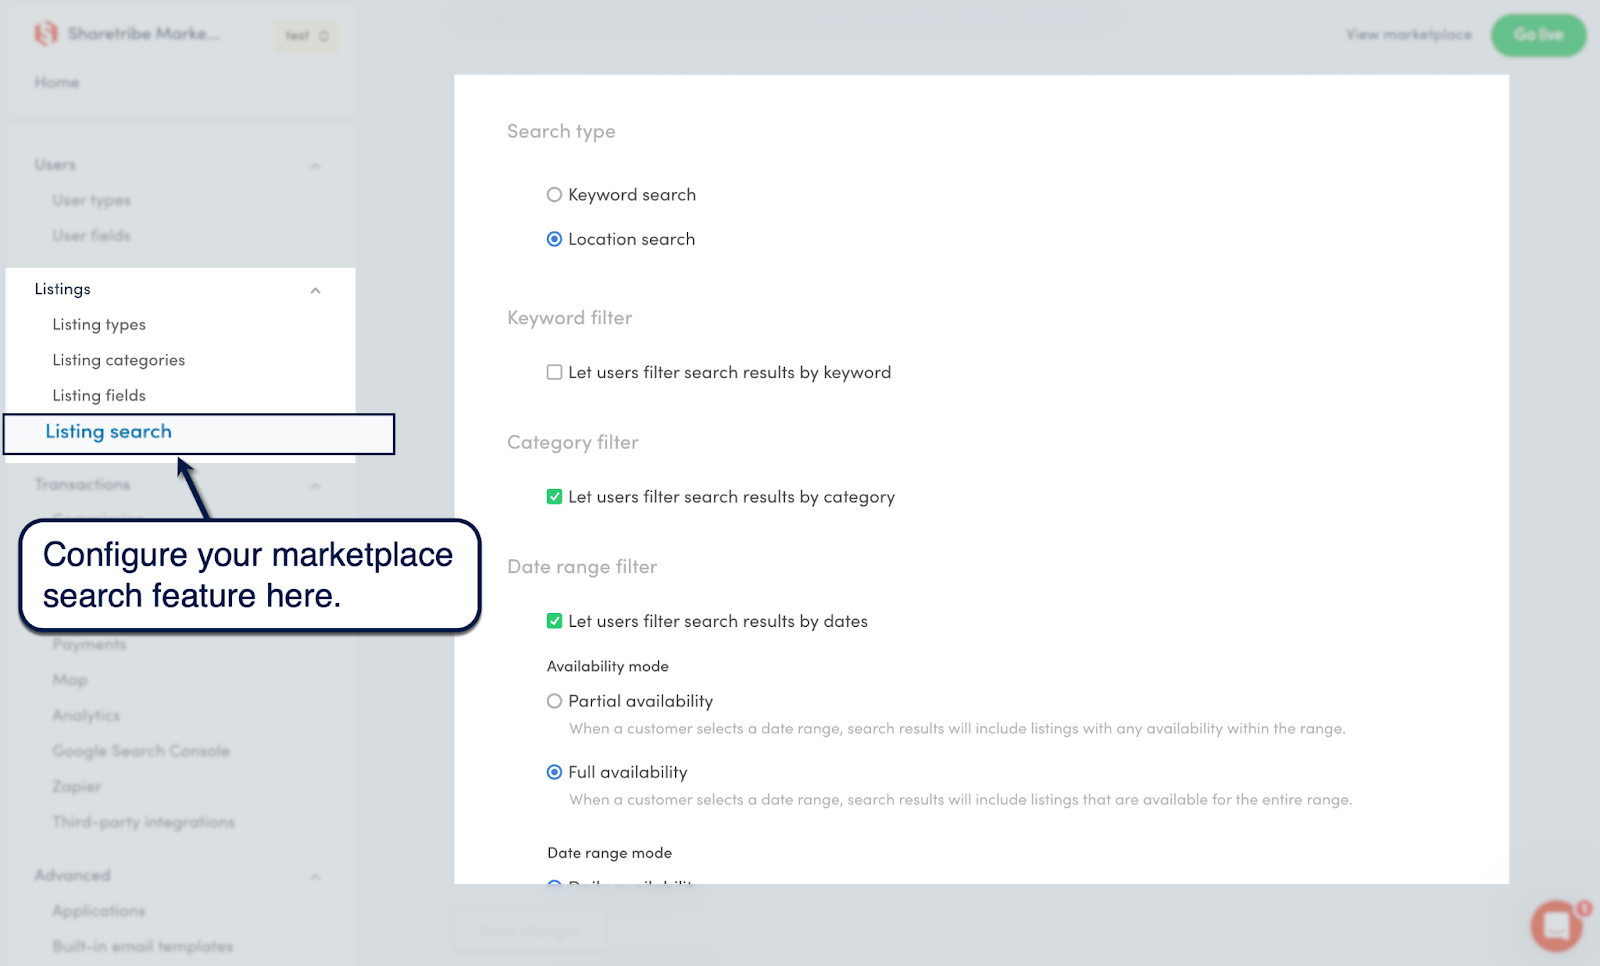
To wrap up this stage of marketplace creation, go to 'Listing search' to control how your marketplace search feature behaves.
Pick between a location-based or keyword-based search, control the available filters, or configure a price filter to help users browse listings based on affordability.
At this point, you need to start thinking about how to make money from your marketplace.
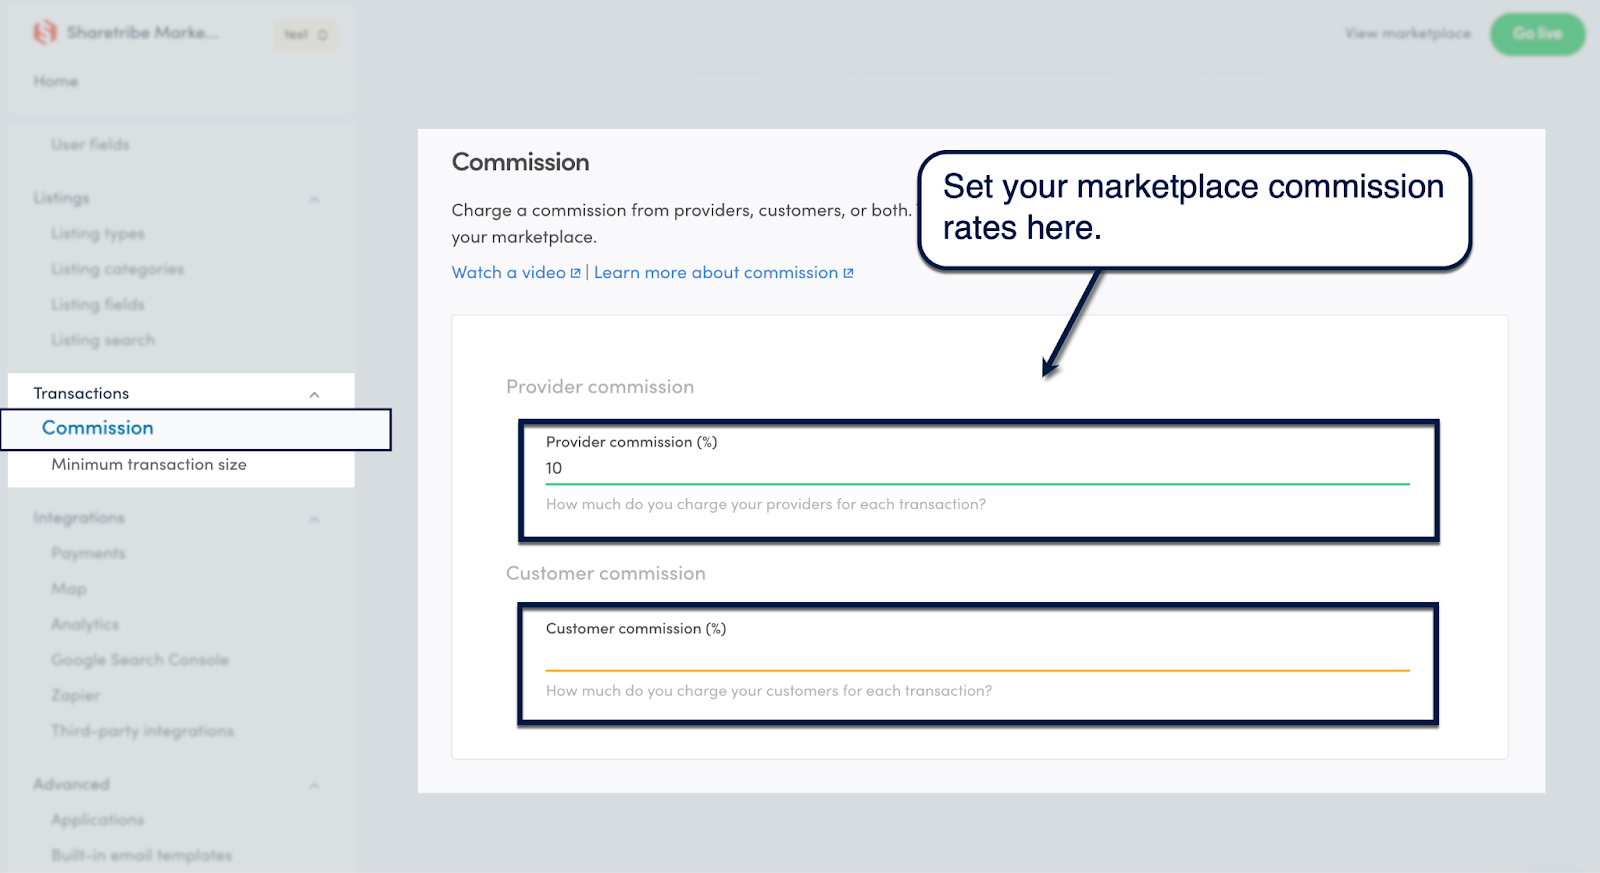
From the 'Transactions' submenu, click 'Commissions' to start setting your commission rates from providers, buyers, or both.
Just enter your desired percentage value into the "Provider commission" and "Customer commission" fields.
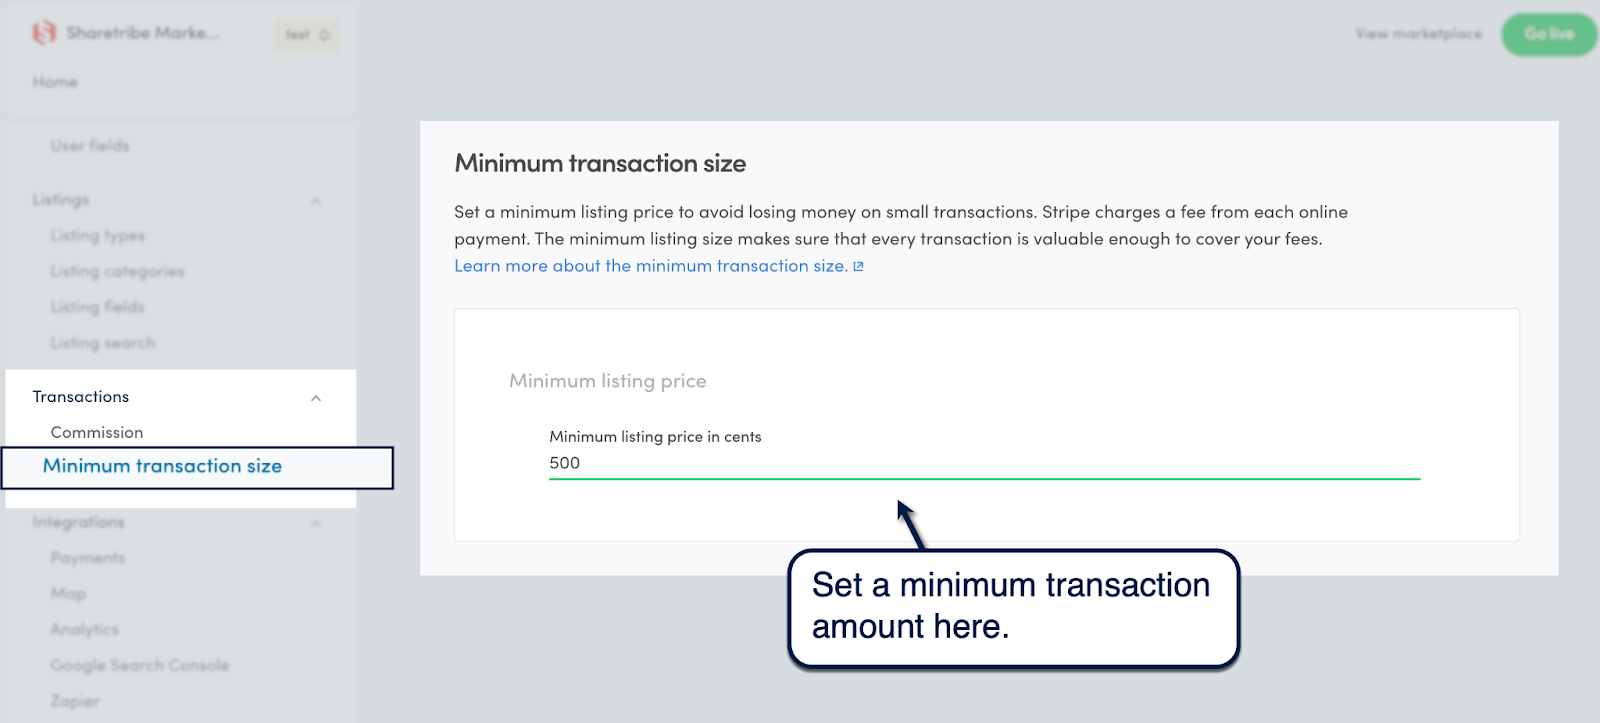
The next step is to set a minimum transaction amount. This ensures you don't lose money to transaction fees on small sales or bookings.
There are two things left to do before you launch your Sharetribe marketplace.
First, you need to set up your marketplace's integrations with key services, namely:
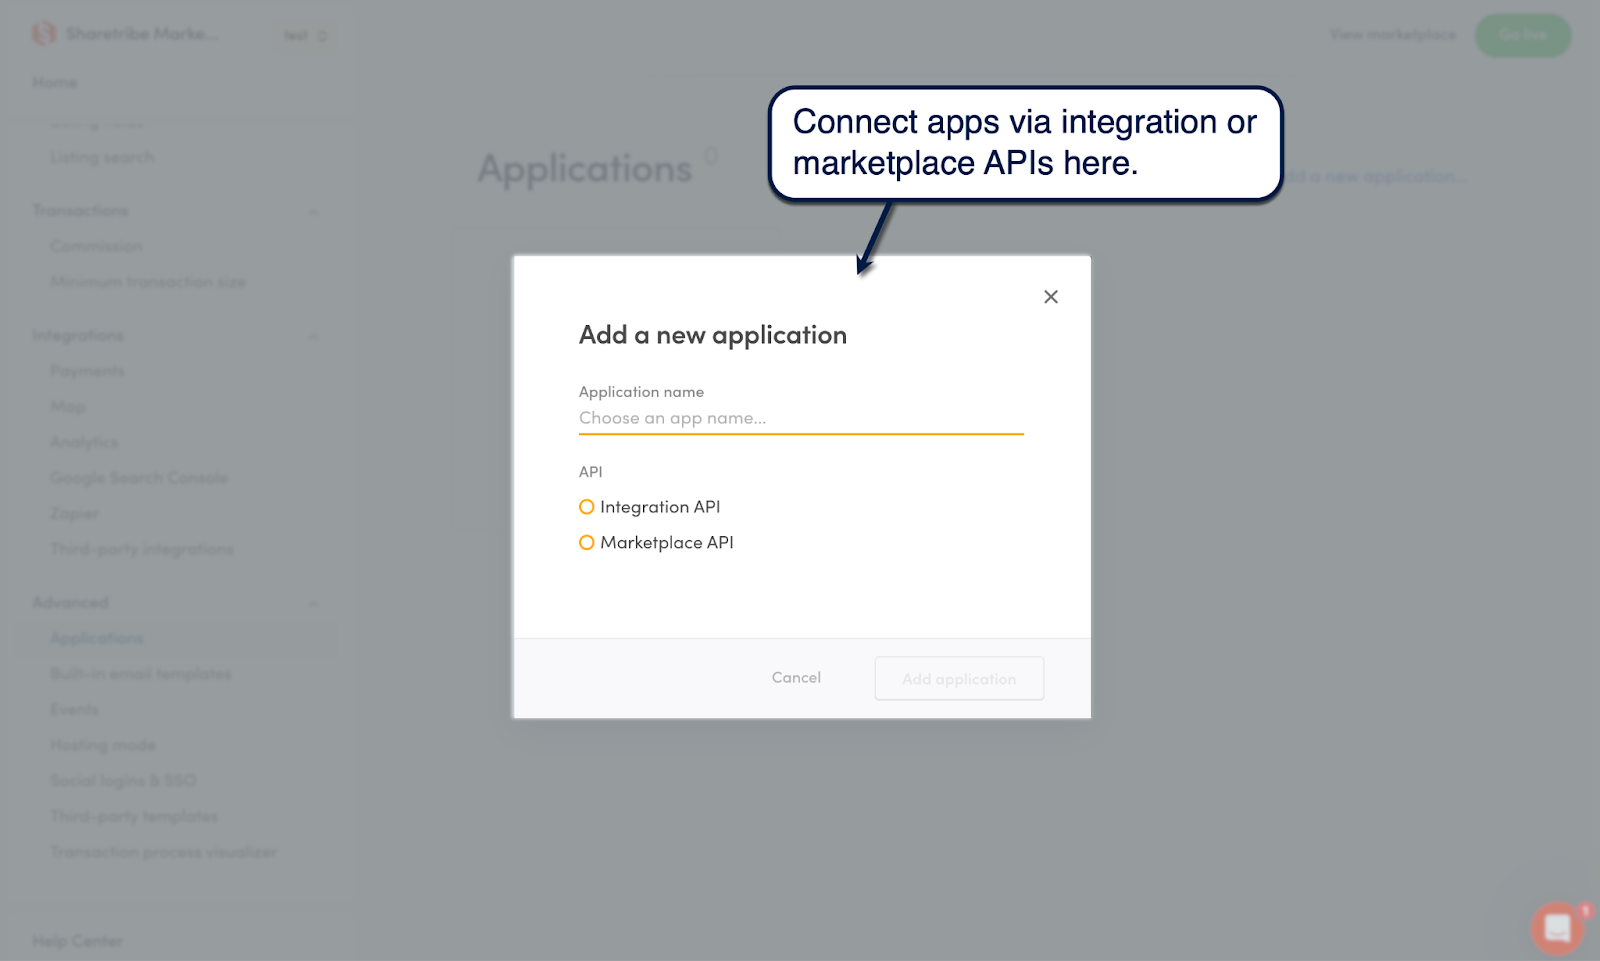
In addition to these native integrations, Sharetribe continues to expand its support for more third-party services like Lemonado and ShopSync. You can also connect service APIs by going to 'Advanced,' selecting 'Applications,' and clicking 'Add a new application.'
Below are a few other things you ought to check out when creating a Sharetribe marketplace:
Sharetribe allows you to create and run a test marketplace for only $29. However, launching your marketplace will cost a monthly subscription starting at $139 per month.
If you're planning to go all-in on your marketplace idea, you can also hire certified Sharetribe marketplace developers to do all your heavy lifting.
The budget required for new marketplace projects ranges from $500 to over $10,000, depending on the scope. However, working with a certified custom app development company will ensure you'll get the expertise, tools, and manpower you need to build your marketplace exactly as how you envisioned it.
Ready to kickstart your Sharetribe journey?
Our innovation-driven team here at Horizon Labs is more than happy to be your partner throughout this exciting phase of your startup.
Let's begin with a small demo project to help you evaluate if we're a good fit.
Yes. Sharetribe's Developer Platform exposes the codebase so you can build custom search, bespoke transaction flows, custom pricing and commission logic, and third-party integrations. Well beyond what the no-code console allows.
A custom Sharetribe marketplace typically takes a few weeks to a few months depending on the complexity of your transaction model, integrations, and design. Scoping a focused first version keeps the initial timeline short and lets you launch and learn faster.
For anything beyond the no-code console (custom flows, integrations, or a tailored UI) yes. An experienced Sharetribe developer or studio can extend the platform to match your specific business model rather than forcing your model to fit the defaults.
Custom Sharetribe builds commonly start in the low five figures and scale with feature complexity. Ask a prospective partner to scope a small pilot first so you can validate quality and fit before committing to the full build.
Horizon Labs builds and scales custom Sharetribe marketplaces end to end. Book a free intro call. We'll even scope a small pilot project so you can see the quality of our work before you commit.

Discover the top 19 Sharetribe developers, including certified agencies and freelancers, to fast-track your marketplace project. Get expert Sharetribe help.
Decide whether to configure, extend, or migrate an operating Sharetribe marketplace using platform boundaries, production evidence, acceptance, and handoff.
Build Sharetribe discount codes with server-side eligibility, funding, safe line items, use limits, refunds, reconciliation, tests, rollout, and rollback.
Tell us what you're building. After an intro call with our founders, you'll hear back within 72 business hours: a written scope with an hour range and a hard ceiling, or the questions we need answered first.